
Other Wikis
- EC Internal Users
- EC Internal Users
Once logged-in as a Self-registrant, LEAR or Account Administrator of your organisation, and depending on your permissions, you are able to view/manage your organisation's data, PIC registration, and roles from the My Organisation(s) section (1) of the portal.
A self-registrant can complete the registration of their organisation by selecting the "Continue Registration" button (2).
When the organisation's registration is validated (3), only the LEAR and Account Administrator(s) (if any) are able to view/modify the organisation's data (4).
The LEAR and Account Administrator(s) of the organisation can view the organisation-level user roles and permissions, but only the LEAR of the organisation can edit these roles and permissions (5).

To view the organisation's details, in the My Organisation(s) section of the portal, click on the "Actions" button for your organisation and select the "View Organisation" option.

On the My Organisation page > Details tab, you can find the basic information concerning the organisation:
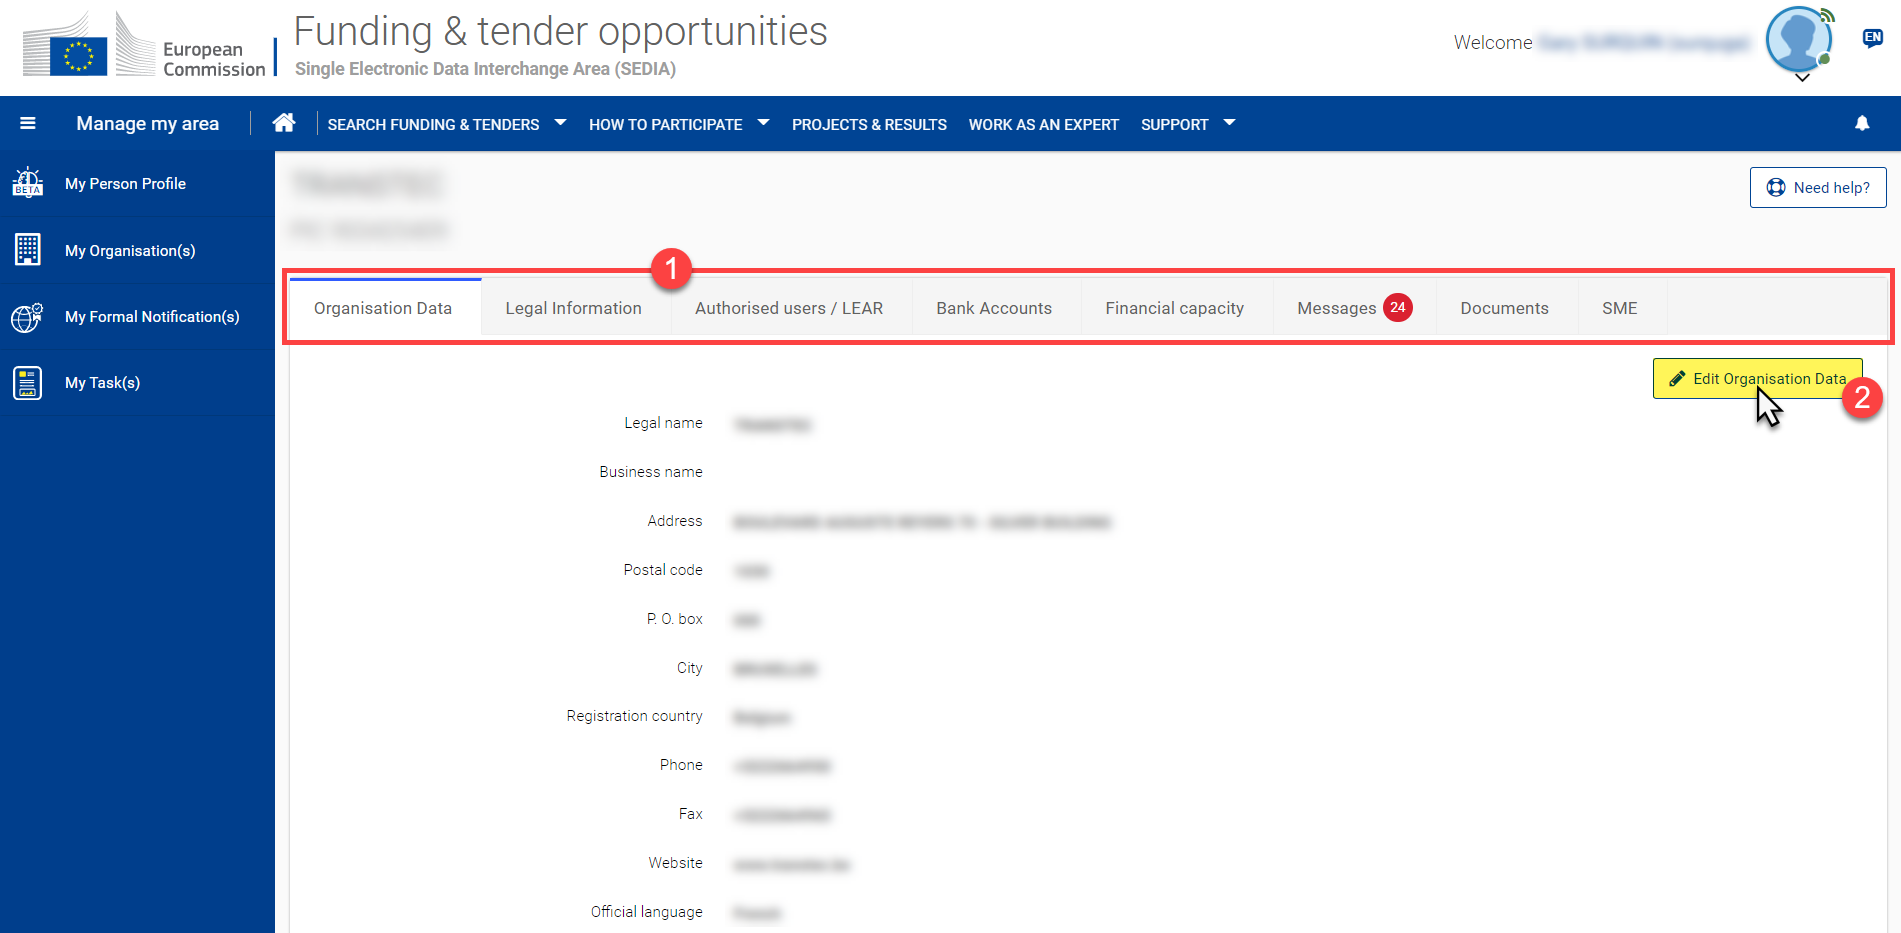
To edit the organisation's details as the LEAR of the organisation, in My Organisation(s) section of the portal, click on the "Actions" button for your organisation and select the "Modify Organisation" option.
On the Organisation Details page, select the tab (1) that you want to edit, and then click on the "Edit (tab name)" button (2) at the top right of the tab.
Edit the fields and manage the documents as required and as detailed in the corresponding sections below, and then click on the "Submit" button at the bottom right of the page to save your changes.
Tip: Remember to first click on the "Edit (tab name)" button, apply your modifications, and then click on the "Submit" button to save your changes and for each tab that you modify.
To edit the organisation information, select the Organisation Data tab and click on the "Edit Organisation Data" button to enable the edit mode.
(*) – required fields
Tip: Remember to click on the "Submit" button at the bottom right of the page to save your changes to the Organisation Data.
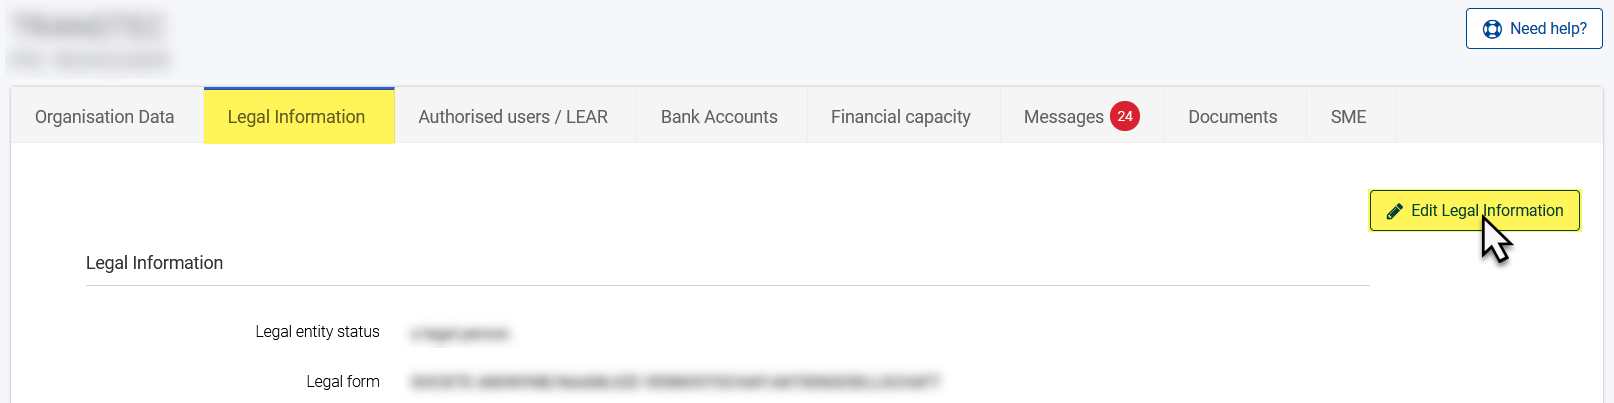
To edit the legal information of your organisation, select the Legal Information tab and click on the "Edit Legal Information" button to enable the edit mode.
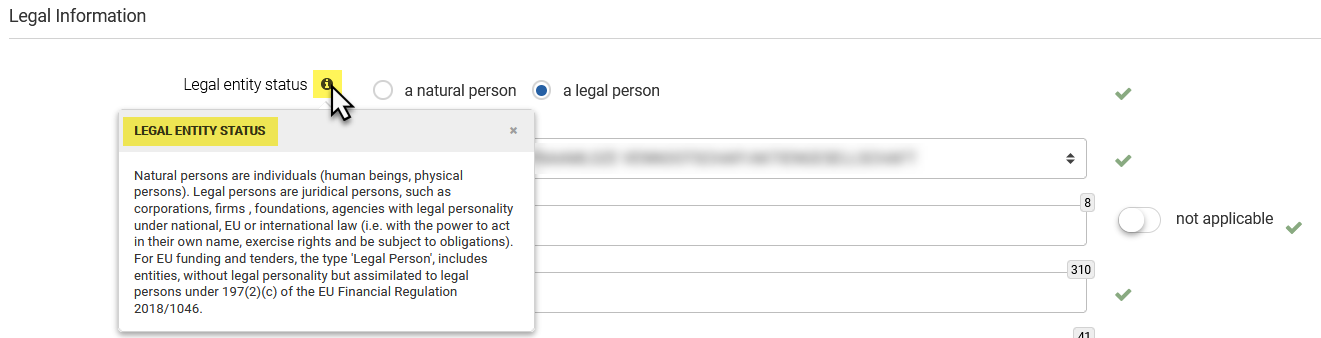
For help completing the fields and in edit mode, click on the info icon![]() of any of the fields to display the eHelp tooltip, that provides a full description for the corresponding field.
of any of the fields to display the eHelp tooltip, that provides a full description for the corresponding field.
Tip: Remember to click on the "Submit" button at the bottom right of the page to save your changes to the Legal Information.
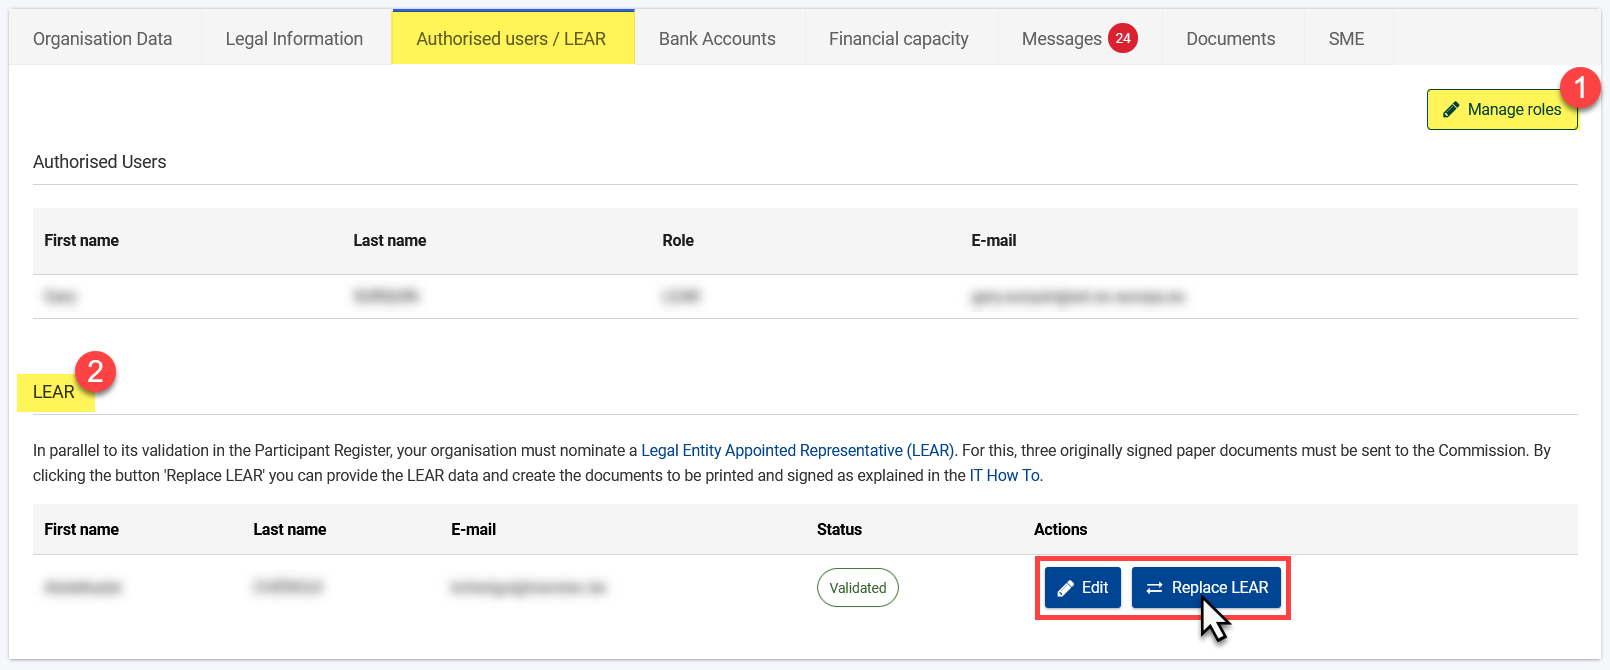
To edit/change the authorised users or LEAR of your organisation, select the Authorised Users/LEAR tab.
In this tab, you can either:
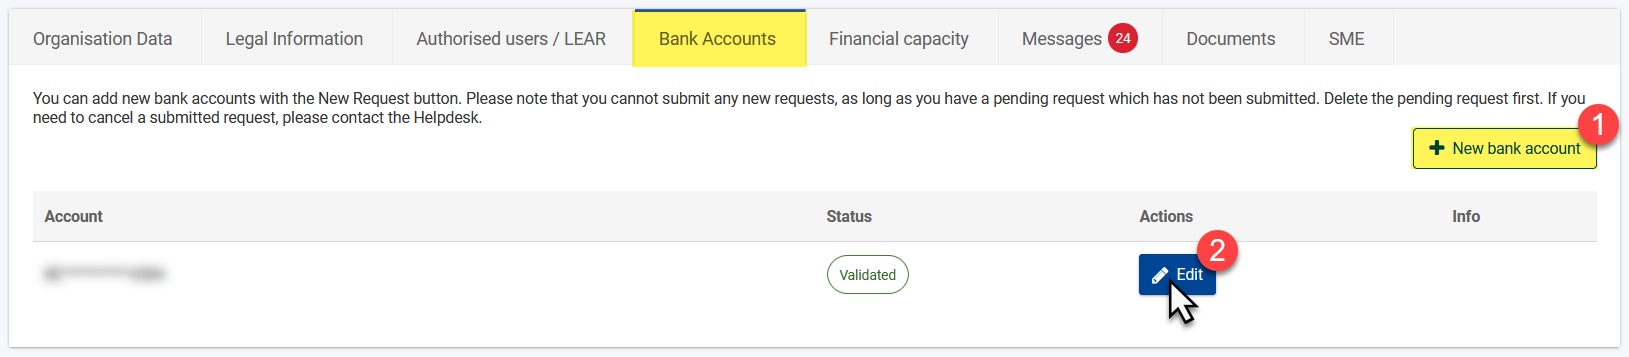
To edit the details of the bank account, or register a new bank account for your organisation, select the Bank Accounts tab.
In this tab, you can either:
You might be requested to provide additional financial information for your organisation, for which the details (closing date, status and actions) of these requests are managed from the Financial Capacity tab.
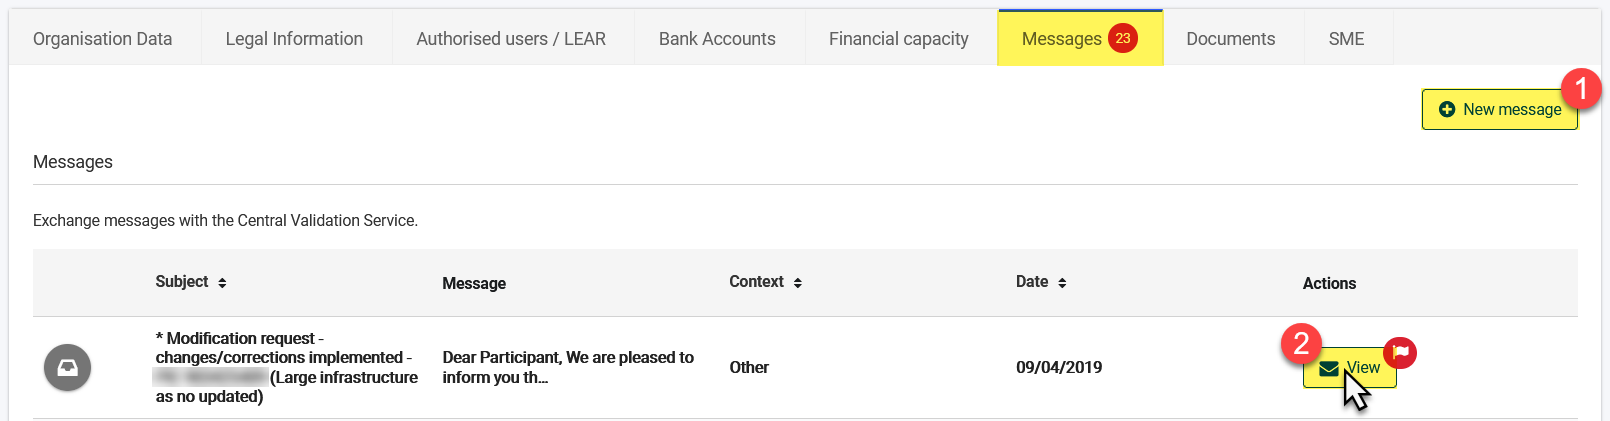
The Messages tab allows you to view or create (exchange) messages/notifications with the Central Validation Service.
In this tab, you can either:
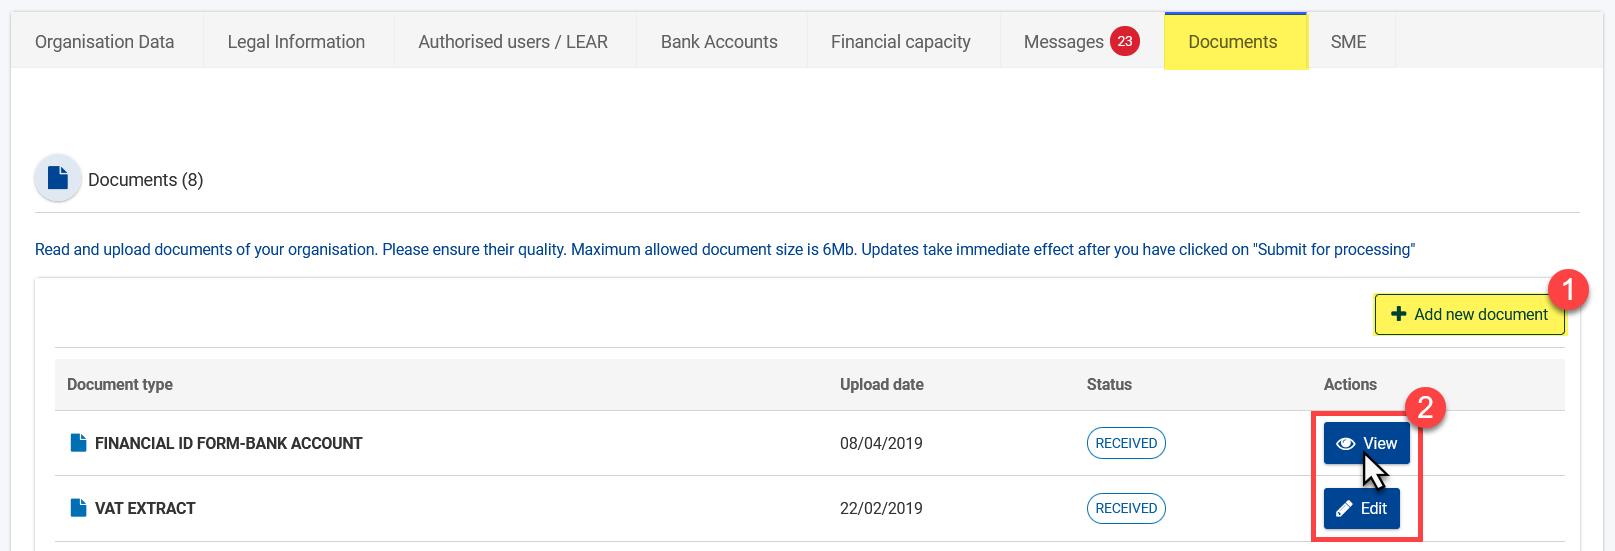
The uploading of documents to the Central Validation Service is essential to the registration and validation process of your organisation, and is managed from the Documents tab.
In this tab, you can either:
For certain participations, you will be required (if relevant) to register - status declaration - your organisation as a SME (Small and Medium-sized Enterprise) from the SME tab.
In this tab, there are two ways to define your SME status:

To view/edit the organisation roles, in the My Organisation(s) section of the portal, click on the "Actions" button for your organisation and select the "View Roles" option.
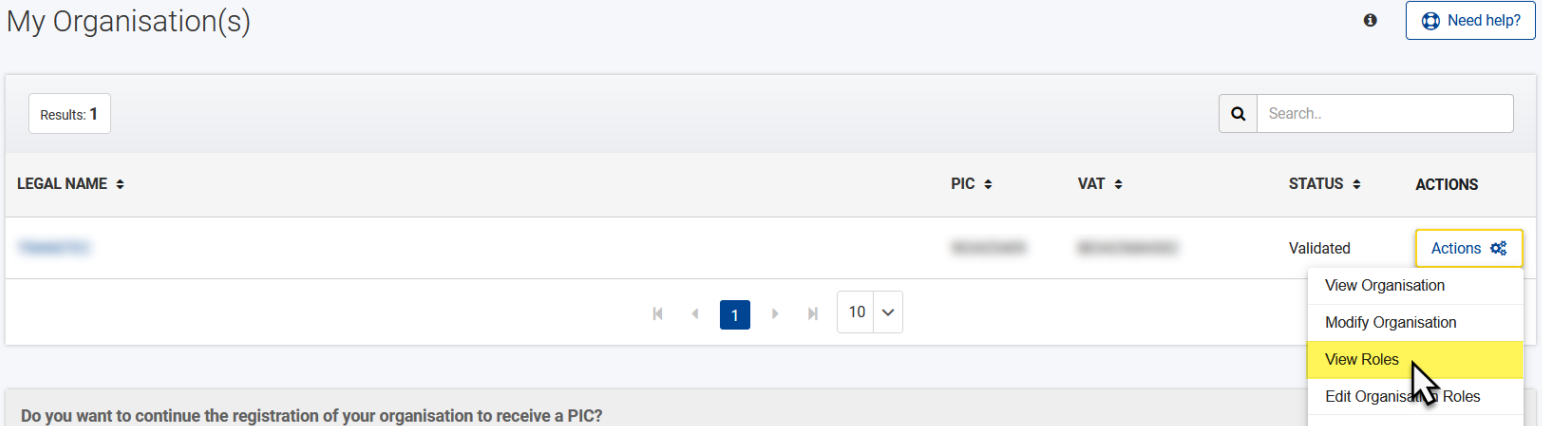
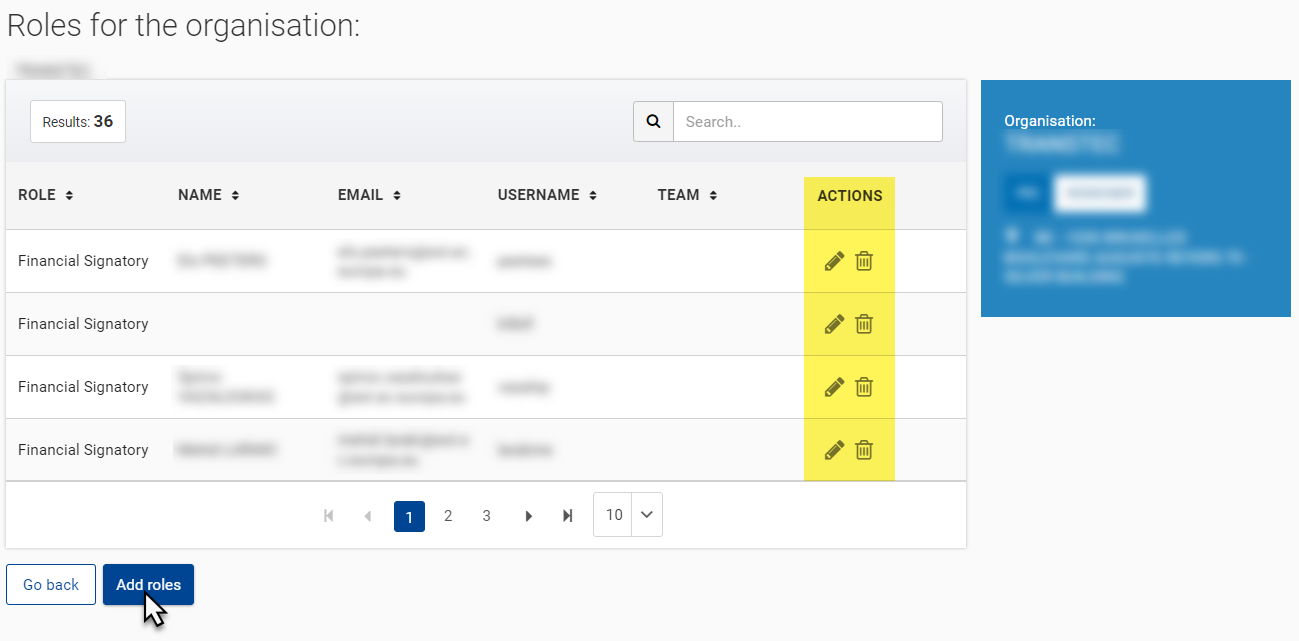
Select the Roles tab (if not already selected by default) to view the list of roles (1), including the corresponding user name, e-mail address, username, team, last change date and details (if relevant) for each role registered for the organisation.
You can search for a specific role/user by name or e-mail address (2), download the list to an Excel file (3), or Edit Organisation Roles (4) if you are the LEAR or Account Administrator of the organisation.
For more information on user roles and associated permissions, please view Overview of User Roles and Permissions.
Filter the results in the list from the Filter Data input field (5), and select other role types (6) if needed.

In the Edit Organisation Roles function:
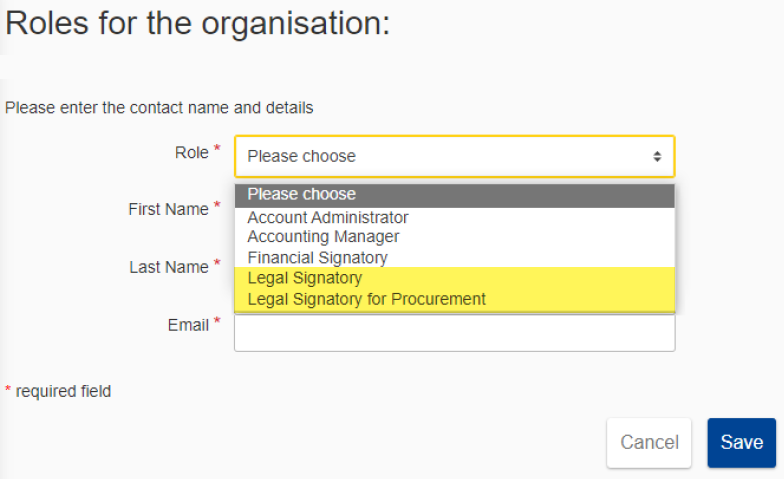
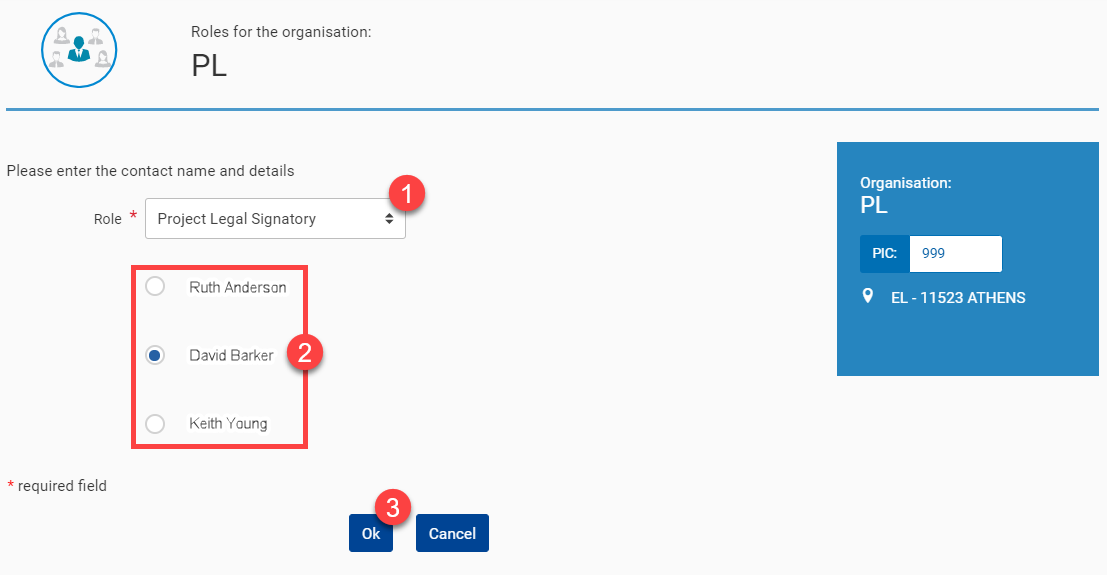
For the Add Role function, select the required role, enter first name, last name, and e-mail address of the user for the role, and then click on the "Save" button to confirm.

Important note for Legal Signatory roles (LSIGN and Procurement LSIGN):
Please make sure that you assign the appropriate Legal Signatory role (Legal Signatory – LSIGN, and/or Legal Signatory for Procurement – Procurement LSIGN) for your organisation and procedure(s).
Legal Signatories (LSIGN and Procurement LSIGN) are nominated for an organisation by the LEAR or an Account Administrator:
Legal Signatories have the right to sign contracts and amendments managed through the Funding and Tenders Portal on behalf of the organisation, so their role is relevant at organisation and project-level.
An organisation can have an unlimited number of Legal Signatories.
For Procurement Contracts, Specific Contracts under Framework Contracts, or Contribution Agreements:
>> Please also view Overview of User Roles and Permissions.
The PCoCo role is specific to a procedure, and there can be only one PCoCo per procedure/contract.
Only the LEAR/Account Administrator, or current PCoCo of the procedure, can nominate, modify or revoke the PCoCo role of a procedure.
Important note: Any Coordinator Contact (CoCo) of an Organisation can respond to a call for tender or invitation for submission, but it is the PCoCo that is responsible for the procedure.
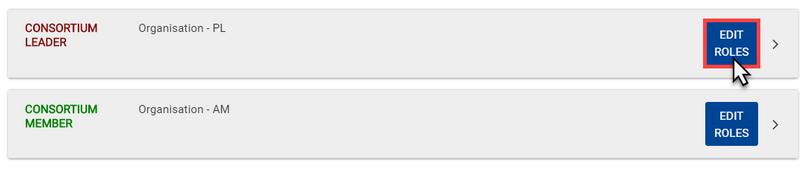
Organisational-level roles (LEAR, LSIGN and Procurement LSIGN, etc.) are managed from My Organisation. Project-level roles (PCoCo, CoCo, CLSIGN) are managed directly from the procedure or contract once accessible (i.e. invitation for submission, awarding of a contract, etc.).
For Framework Contracts:
Only the LEAR/Account Administrator, or current PCoCo of the procedure, can nominate, modify or revoke the PCoCo role of a procedure (see Manage Project Roles (PCoCo, CoCo, CLSIGN) below)
For Contribution Agreements:
For Contribution Agreements, the PCoCo is communicated to the Contracting Authority by the representative of the organisation during the negotiation stage (i.e. therefore before contract preparation). The PCoCo is then assigned to the contract by the EC Operational Manager during the contract preparation. Only the LEAR/Account Administrator, or current PCoCo of the Contribution Agreement can modify or revoke the PCoCo role of a Contribution Agreement (see Manage Project Roles (PCoCo, CoCo, CLSIGN) below)
For a specific invitation, submission, or contract, Procurement LSIGNs, PCoCos, CoCos can manage the project-level roles of users that are within their own organisation (unique PIC ID), and any user within the organisation can have multiple roles.
Reminder: For Contribution Agreements, the PCoCo is communicated to the Contracting Authority by the representative of the organisation during the negotiation stage (i.e. therefore before contract preparation). The PCoCo is then assigned to the contract by the EC Operational Manager during the contract preparation. |
For example (Procurement LSIGN and CLSIGN):
Legal Signatories (LSIGN or Procurement LSIGN) have the right to sign contracts and amendments managed through the Funding and Tenders Portal on behalf of the organisation, so their role is relevant at organisation and project-level.
An organisation can have an unlimited number of Legal Signatories.
For Procurement Contracts, Specific Contracts under Framework Contracts, or Contribution Agreements:
Important note:
A user will therefore need to be nominated as either a Procurement LSIGN or CLSIGN for the contract in order to sign a contract (or amendment – if relevant). Please view Contract Signature for more information.
How to manage Project Roles - Procedure or Contract (PCoCo/CoCo/CLSIGN)
Remember:
For a Procedure (invitation or submission) - PCoCo/CoCo


Add a role to a Contract - PCoCo/CoCo/CLSIGN


Modify the PCoCo of a signed contract - LEAR/Account Administrator/(current) PCoCo


The My Invitation(s) section of the Funding & Tenders Portal is dedicated to the management of your invitations to participate in a request for services (under Framework Contracts), or the second step of restricted procedures or subsequent rounds of negotiated procedures (under Public Procurement procedures).
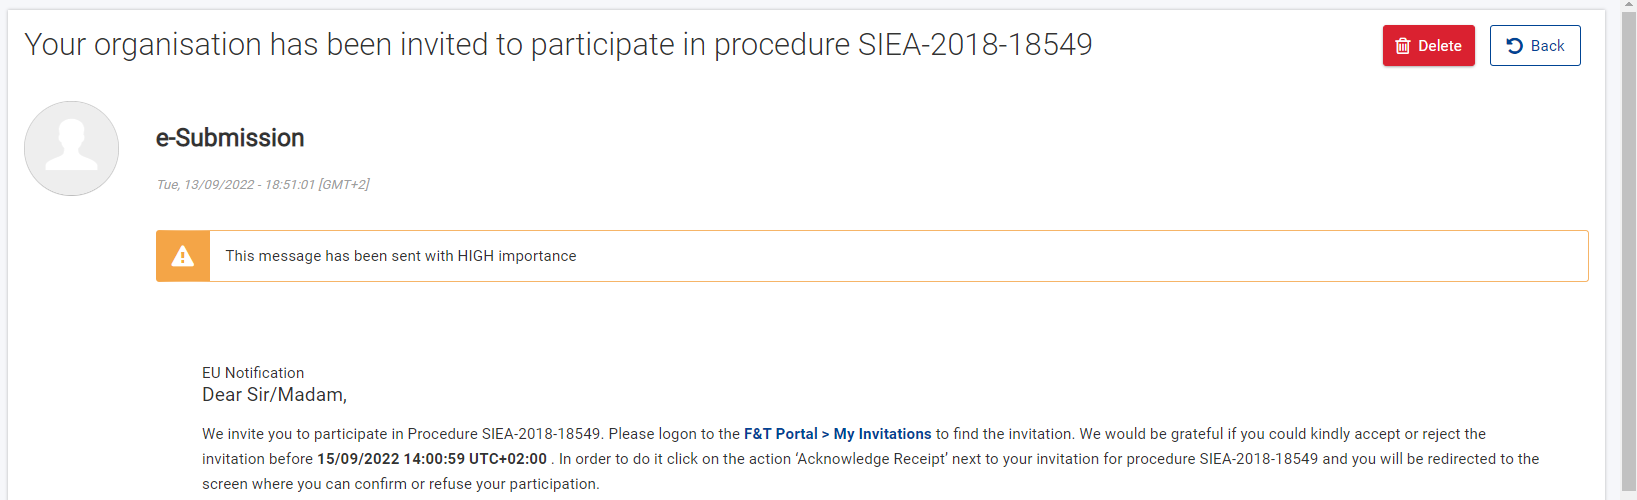
All persons who have an active PCOCO or COCO (Primary Coordinator Contact or Coordinator Contact) role within the organisation receive the notifications and have access to the invitations to participate, unless a PCOCO has already been assigned to the procedure. If a PCOCO has not been assigned to the procedure, the person in the organisation that responds to an invitation (i.e. expresses their willingness to participate) automatically becomes the PCOCO for that procedure/project. The responder can also assign another Coordinator Contact as the PCOCO for the procedure.
Once the invitation to participate is accepted and the new submission started, the draft submission is created (accessible from My Submission(s)), and is automatically assigned to the PCOCO of the procedure/project.
>> For full instructions on how to manage your Invitations, please view Manage My Invitations.
>> For further information on how to manage Procedure Roles, please view Manage Project Roles (PCoCo, CoCo, CLSIGN).
The My Submission(s) section of the Funding & Tenders Portal is dedicated to the management of your tender submissions through eSubmission for:

>> For instructions on how to manage your Submissions, please view Manage My Submissions.
>> For further information on how to manage Procedure Roles, please view Manage Project Roles (PCoCo, CoCo, CLSIGN).
3.2.4 My Contract(s)
The My Contract(s) section of the Funding & Tenders Portal is dedicated to the management of your contracts.
To find and access a Contract, login to the portal, select "My Contracts" (1) from the left main menu, and then search for the Contract and/or click on the Contract title from the list of contracts (2) to be redirected to the Contract page.
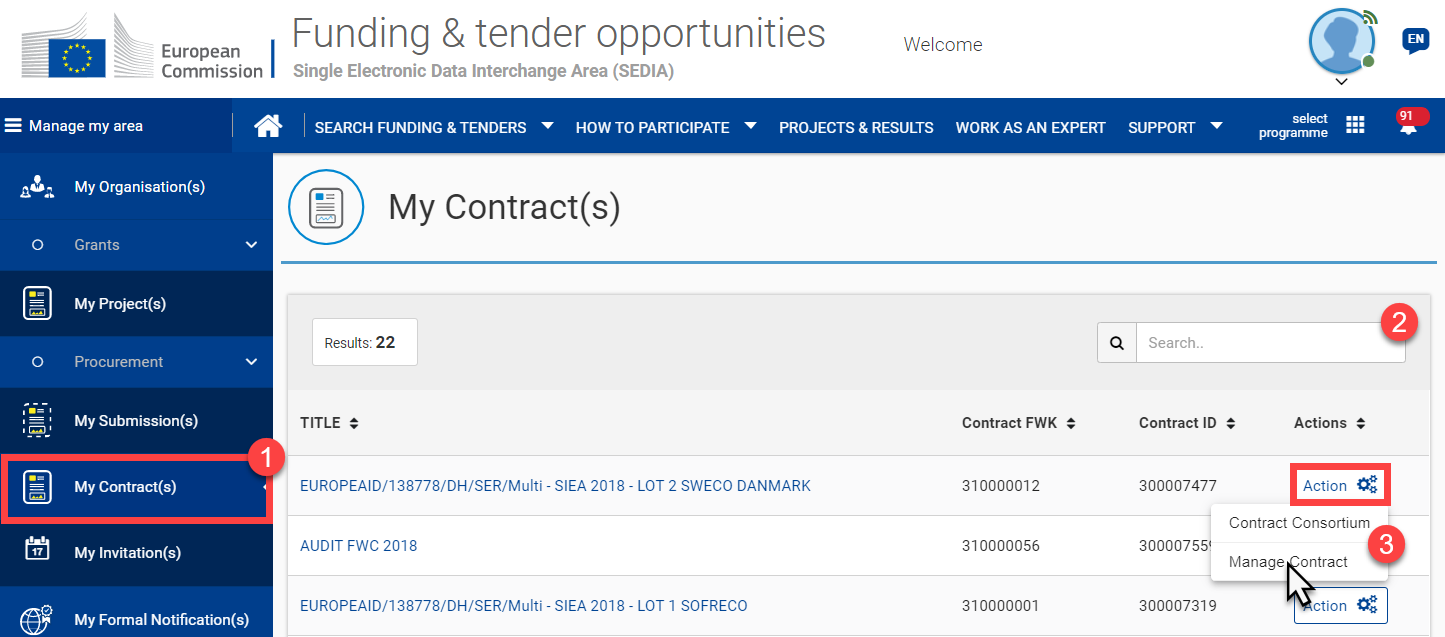
To access the tasks and operations required for the management of the Contract, click on the “Action” button and select the “Manage Contract” (3) option.
>> For the full instructions on how to manage your Contracts, please view Manage My Contracts.
>> For further information on how to manage Contract Roles, please view Manage Project Roles (PCoCo, CoCo, CLSIGN).
The My Intervention(s) section of the Funding & Tenders Portal is dedicated to the reporting on Interventions that have been assigned to Implementing Partners by Operational Managers, for the purpose of collecting results and monitoring the performance of EU implementation activities.
Once logged-in to the portal, select "My Intervention(s)" (1) from the left main menu of the portal, and then search and/or select the Intervention that has been assigned to you from the list (2).

>> For full instructions on how to cooperate with Implementing Partners for the reporting on Interventions, please view Cooperating with Implementing Partners or Experts.
Every time you are required to perform an action (for example, acknowledge an invitation, sign a contract, review a logframe, etc.), you receive a notification and a new task is generated.
You can access your notifications through the bell icon in the upper right corner of the screen.

By clicking on the bell icon, a panel displaying all unread notifications is displayed. From the panel, you can access the details of each notification by clicking on it.
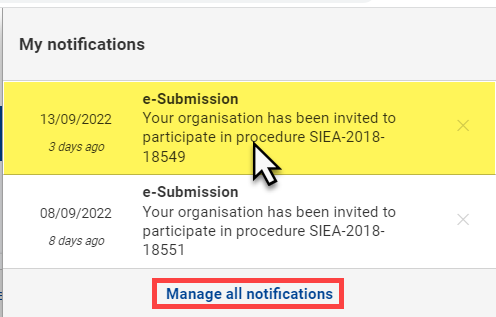
You can also click on the "Manage all notifications" link to be redirected to the My Notification(s) page, where you can manage all your notifications.
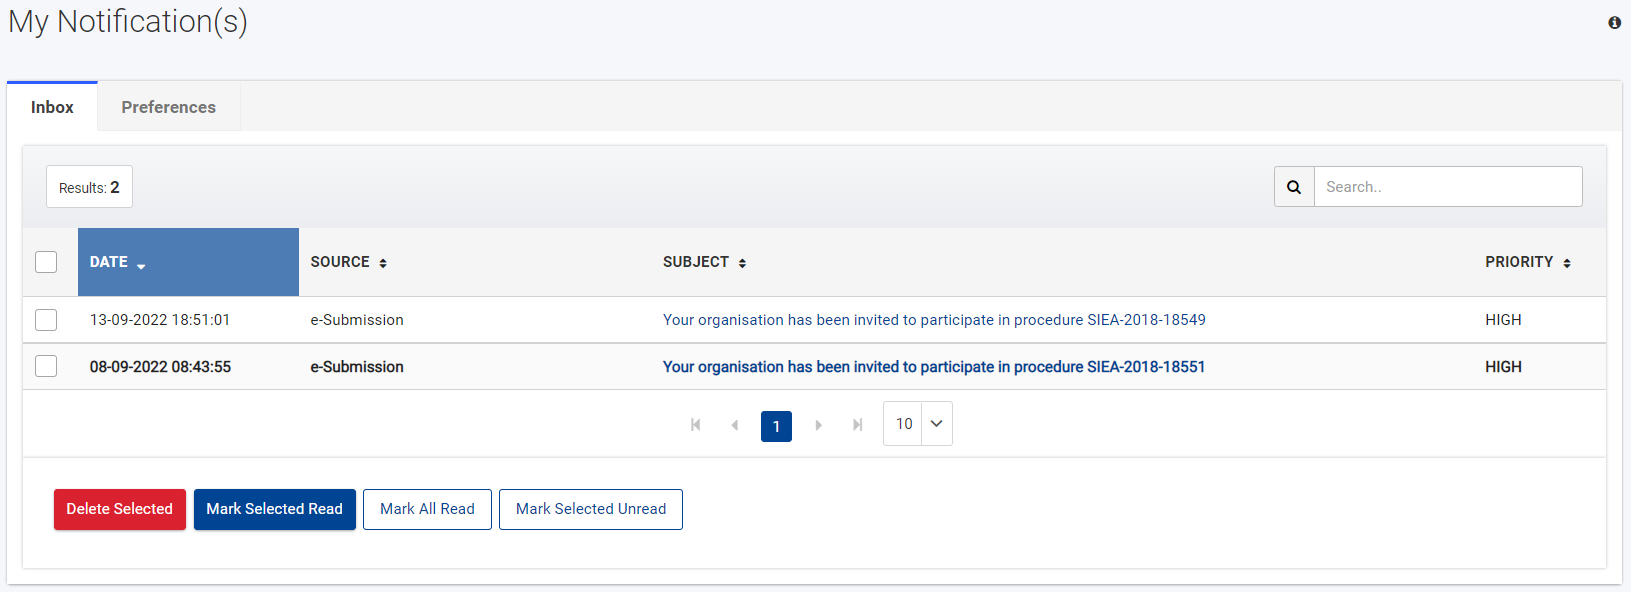
On the My Notification(s) page, you can see the list of notifications, arranged by date and time, and marked as read or unread. Click on the subject link of the notification, and/or use the select options to select a notification and apply an action by clicking on the corresponding button (delete selected, mark selected read, mark all read, or mark selected unread).
All your tasks (pending or completed) will be available in My Task(s).
For the moment, My Task(s) is still under development.

