Welcome
This page provides an overview on how to fill in and submit a Progress or Periodic Report using the dedicated functionality in Beneficiary module, in order to submit the report. Only beneficiary project contacts with edit rights in the project can fill and submit the report while the project is in status Project ongoing.
The illustrations on this page are based on examples from a Periodic report in a KA220-ADU - Cooperation partnerships, call 2023.
Beneficiaries may be asked to submit a periodic or interim report accompanying the request for an interim payment. In other cases, beneficiaries can be as well requested to submit a progress report informing on the state of implementation of the project. Progress reports do not trigger a further payment. The interim and the progress reports must be submitted by the deadline indicated in the grant agreement.
During the project life cycle and before the submission of the final beneficiary report, the National Agency can request the Interim, Progress or Periodic report(s) from the beneficiary.
Under KA171-HED - Mobility of higher education students and staff supported by external policy funds, call 2022 and 2023, beneficiaries will be asked to submit the interim report (2022) or periodic report (2023), informing the NA about the project status and, in some cases, accompanying the request for a further pre-financing payment. The report must be submitted by the deadline indicated in the grant agreement.
Under KA210 - Small-scale partnerships and KA220 - Cooperation partnerships, call 2023, beneficiaries will be asked to submit a periodic or progress report, informing the NA about the project status and, in some cases, accompanying the request for a further pre-financing payment. The report must be submitted by the deadline indicated in the grant agreement.
An email notification is sent to the contacts of the beneficiary organisation when the interim/progress/periodic report request is launched. The relevant report can then be completed and submitted from Beneficiary module.

For KA171 Interim reports, please see How to complete and submit a KA171 Interim or Periodic Report.
Before you start filling the report, please familiarise yourself with the basic report functionalities explained on page Basic functionalities in report forms in beneficiary projects.
Take note
The report can be completed only if the report was requested by the National Agency. For general information on how the report is handled, please see the page Interim, Periodic and Progress Reports in Beneficiary module.
The report to complete depends on the action type and the report type requested by the NA. In addition, the form and fields to complete adapt as per the information you provide when filling in the report. Please read the onscreen information carefully to ensure you provide the correct information.
Please also consult the report templates available at the bottom of this page for the details of each report per action type.
Important
Before you start completing the report, make sure all necessary information in your project, such as Participating organisations, Activities in KA210 projects or Work packages in KA220 projects, is up-to-date.
In the project in Beneficiary module, click on the report specific tab in the content menu. In our example, we click on the Periodic reports tab.
The report specific tab is only available if the report was requested by the NA.
The reports screen opens and it is from here that you will be able to edit and submit the report. In the reports screen, a report timeline will be displayed and the Edit Draft button is available.
If no report was requested by the National Agency, the reports screen will be empty.
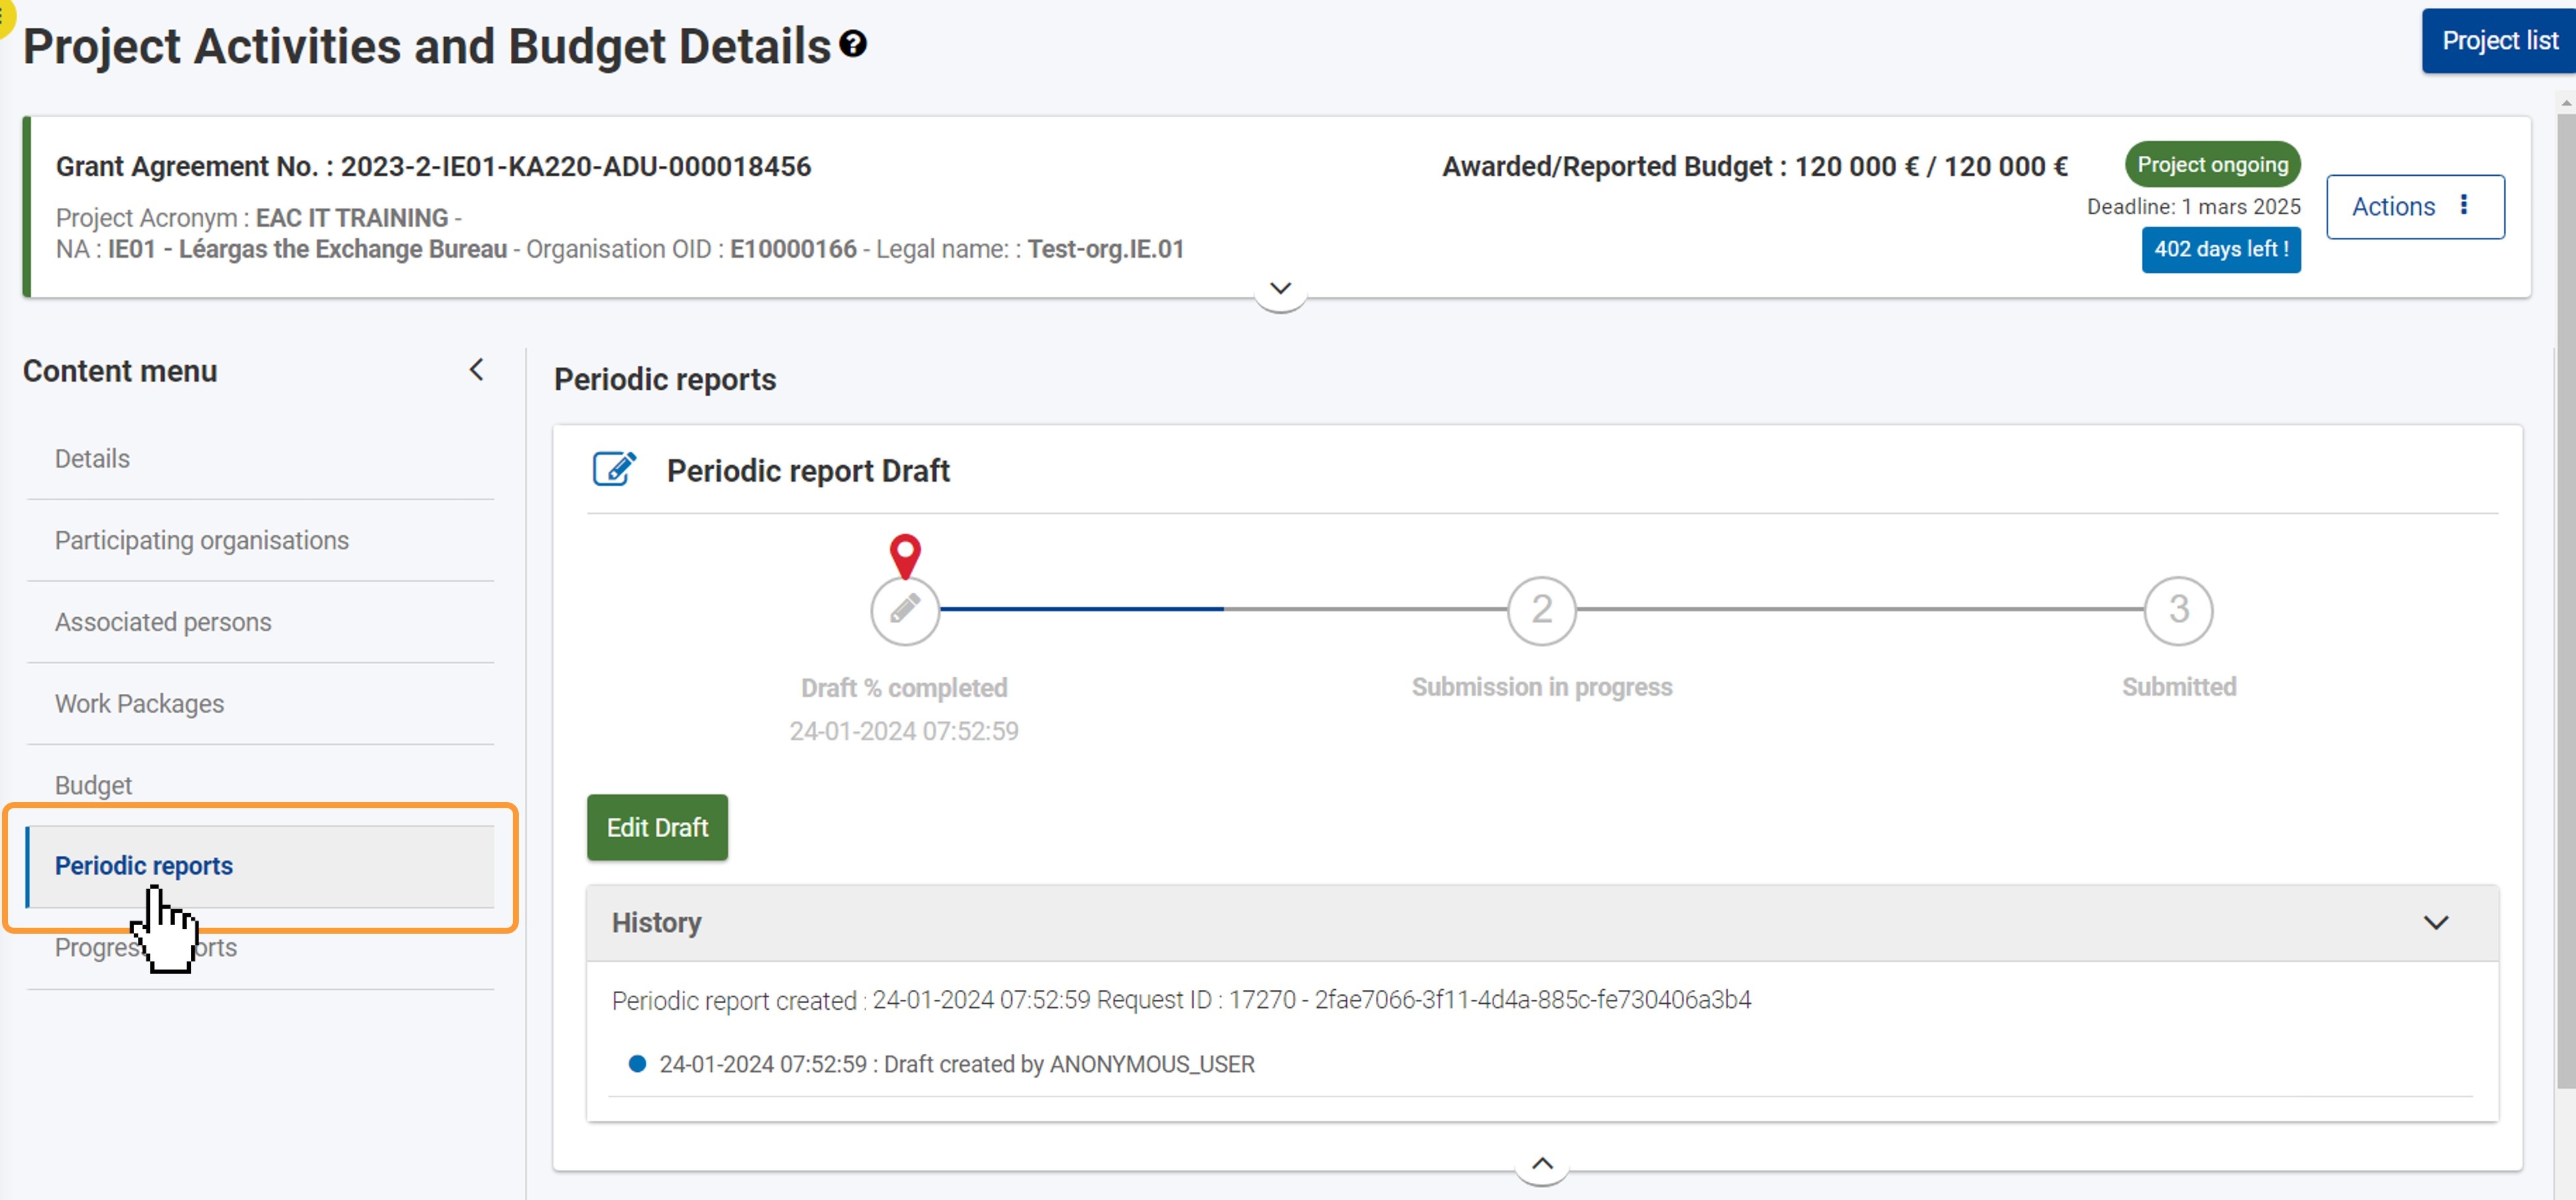
When the report has been requested by the National Agency, the Edit Draft button is available. A timeline graphic is also displayed, showing your progress with the report and the report statuses. In addition, you can view the History of the report by using the dedicated arrow to open the section for more details, or to collapse it.
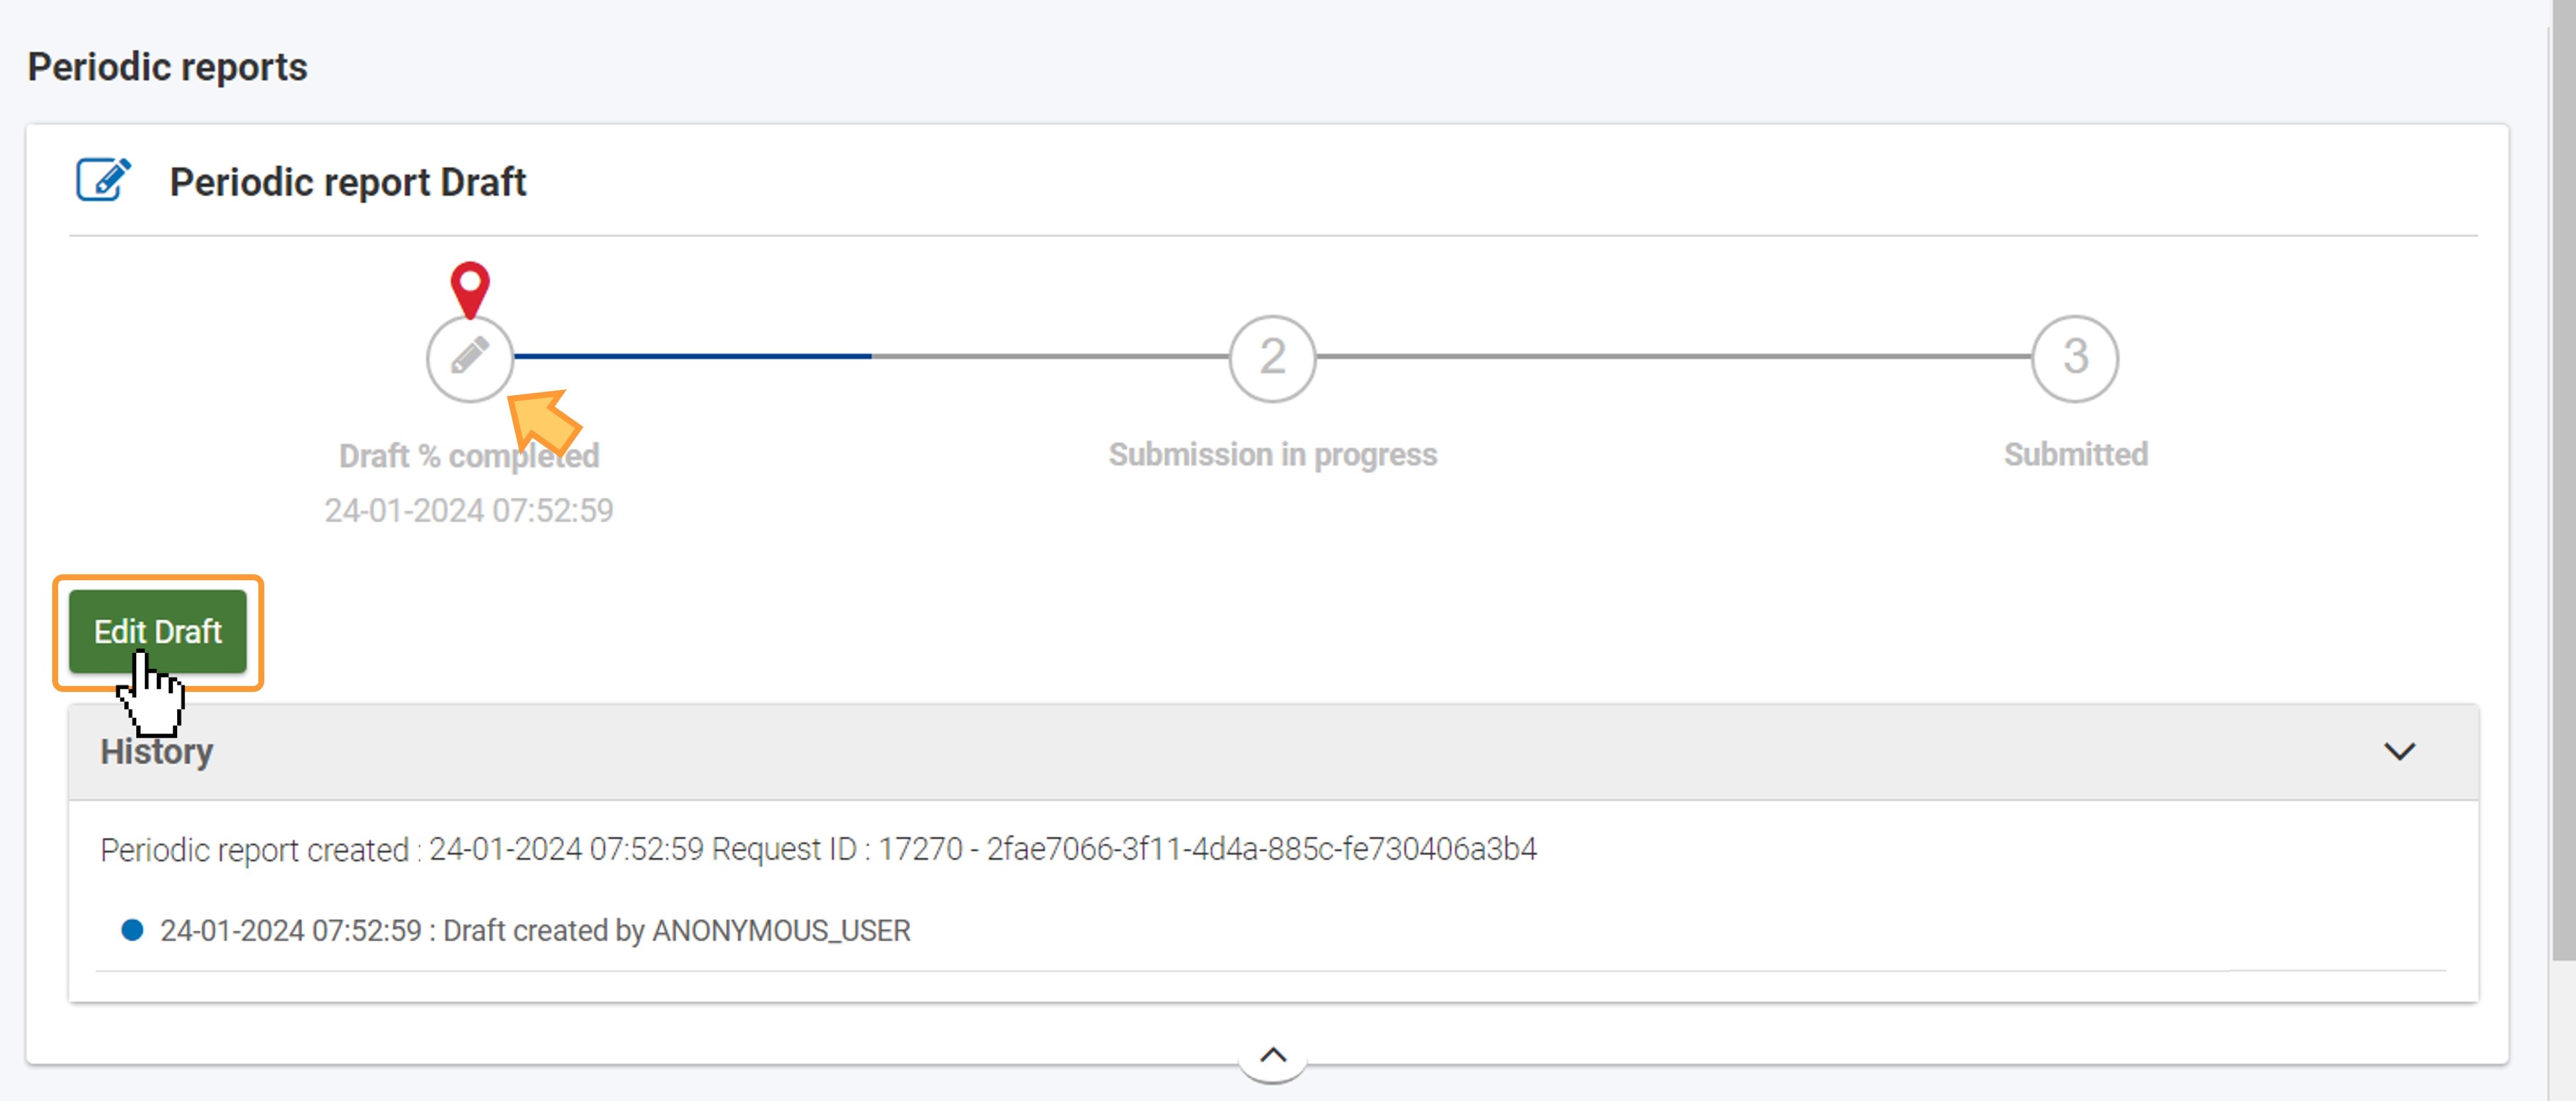
Click on the Edit Draft button to open the report form. Use this button every time you need to access the draft report, where you will be directed to the report details screen.
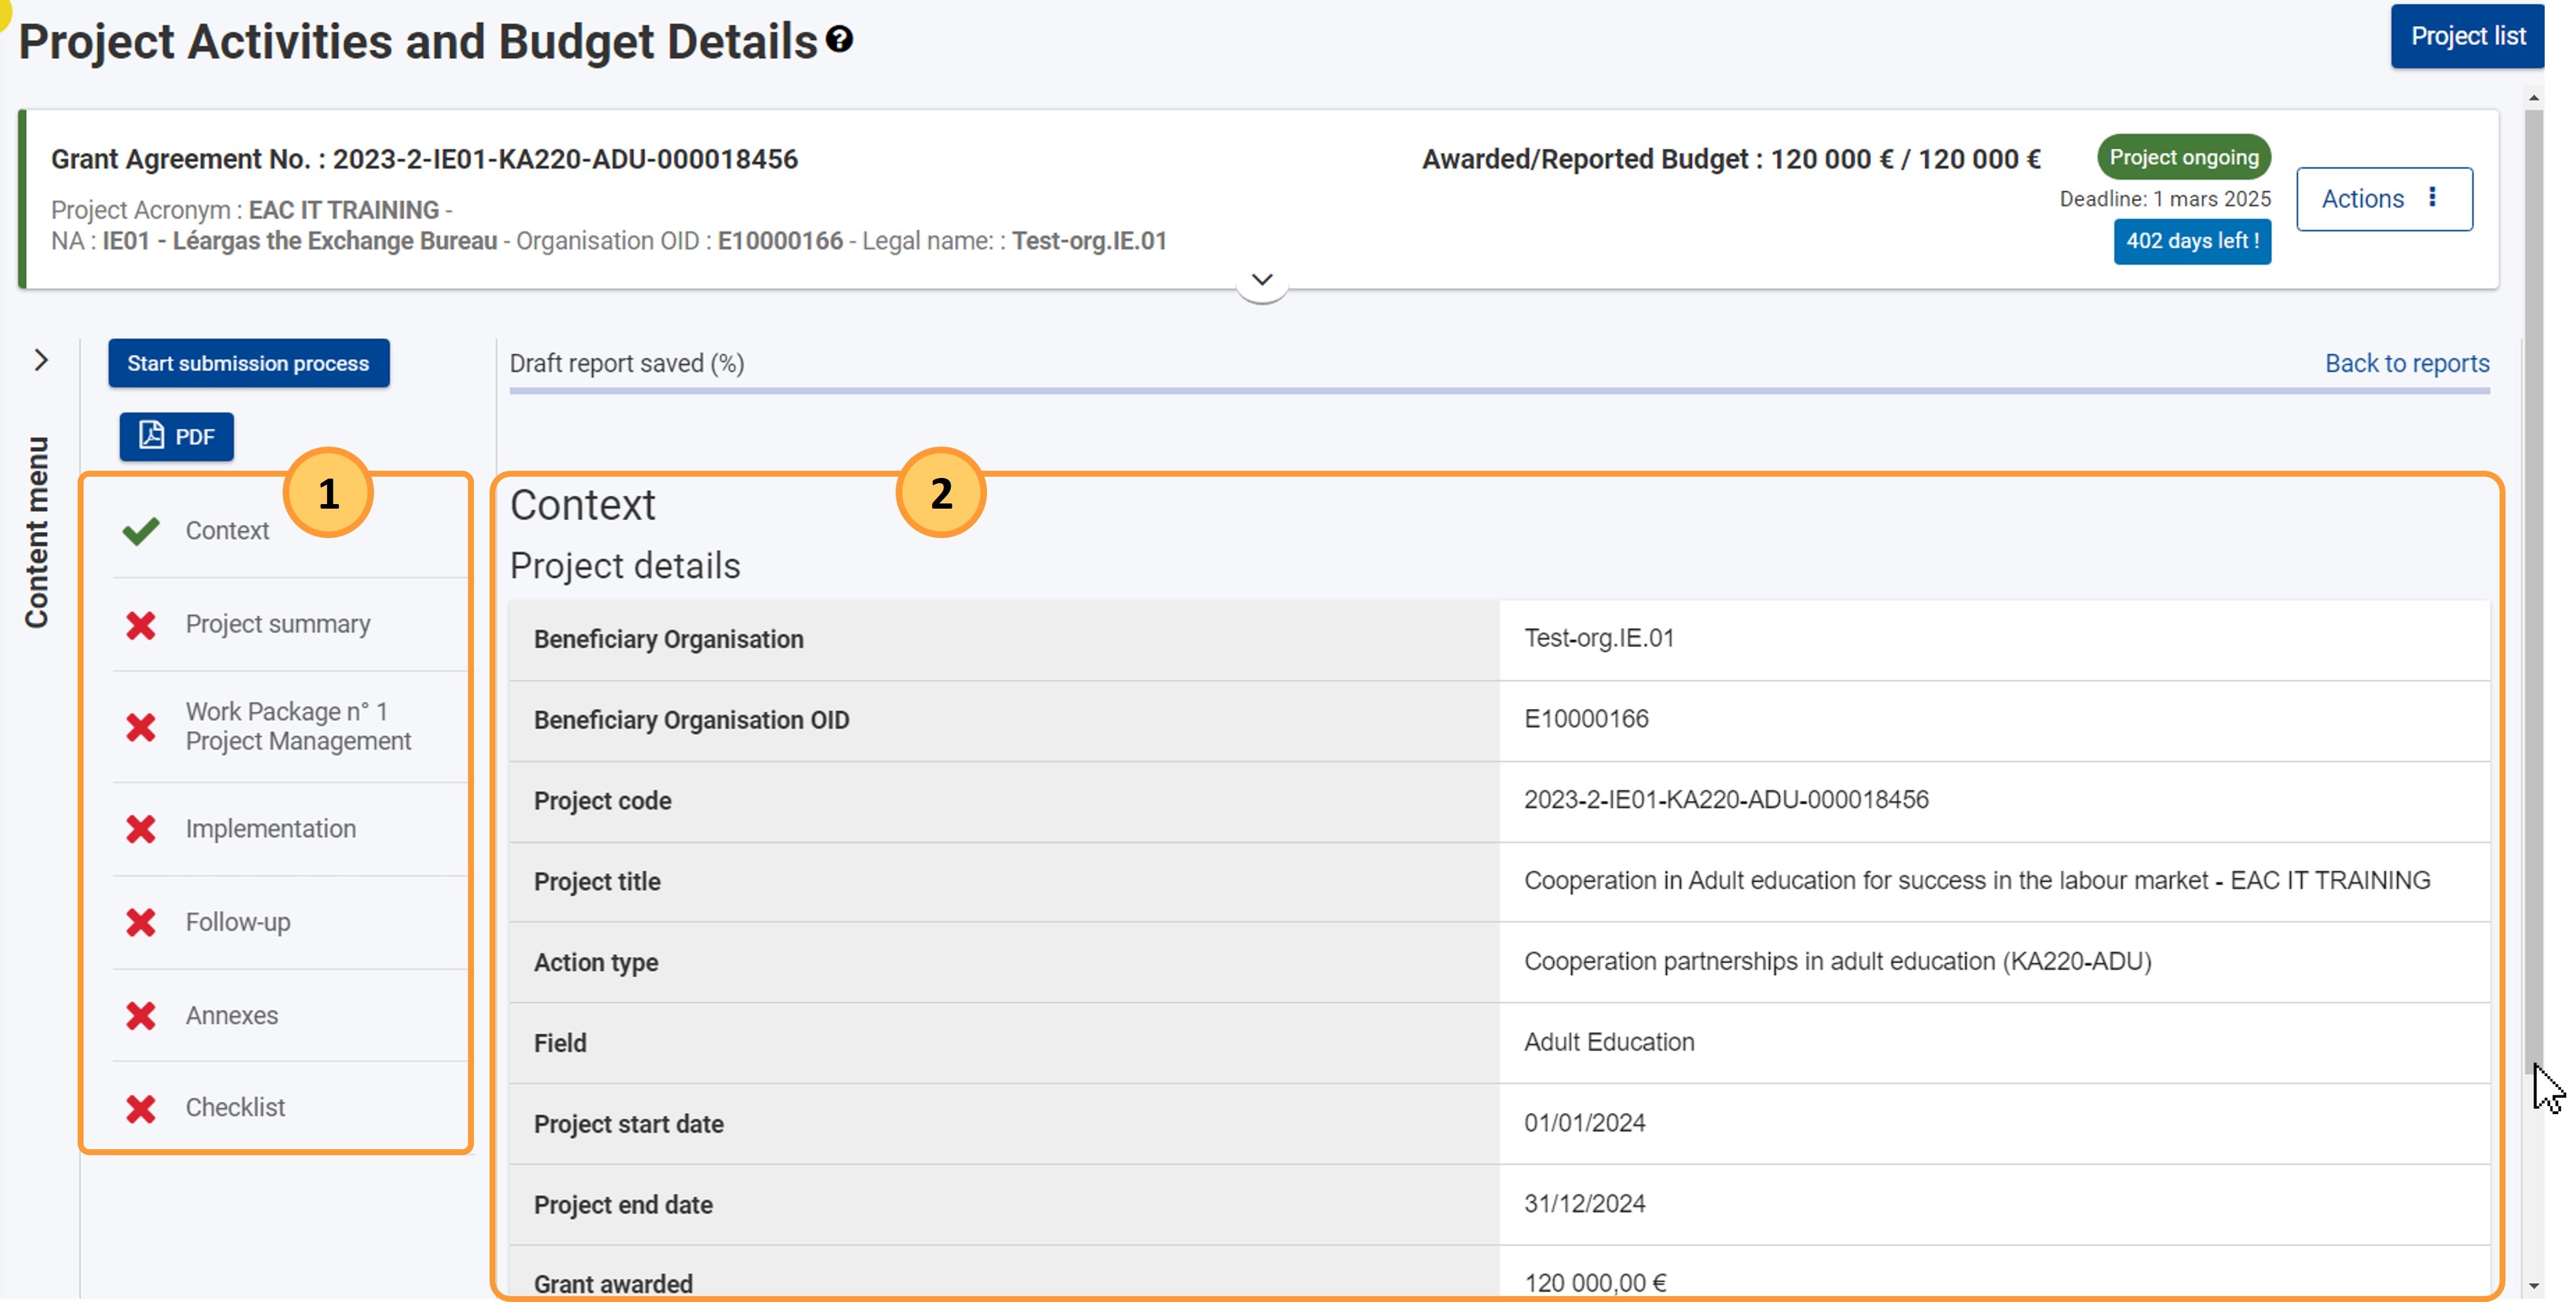
The report form opens, with the navigation menu (1) to easily access the various parts to complete and the content/work area (2) as per selection in the menu.
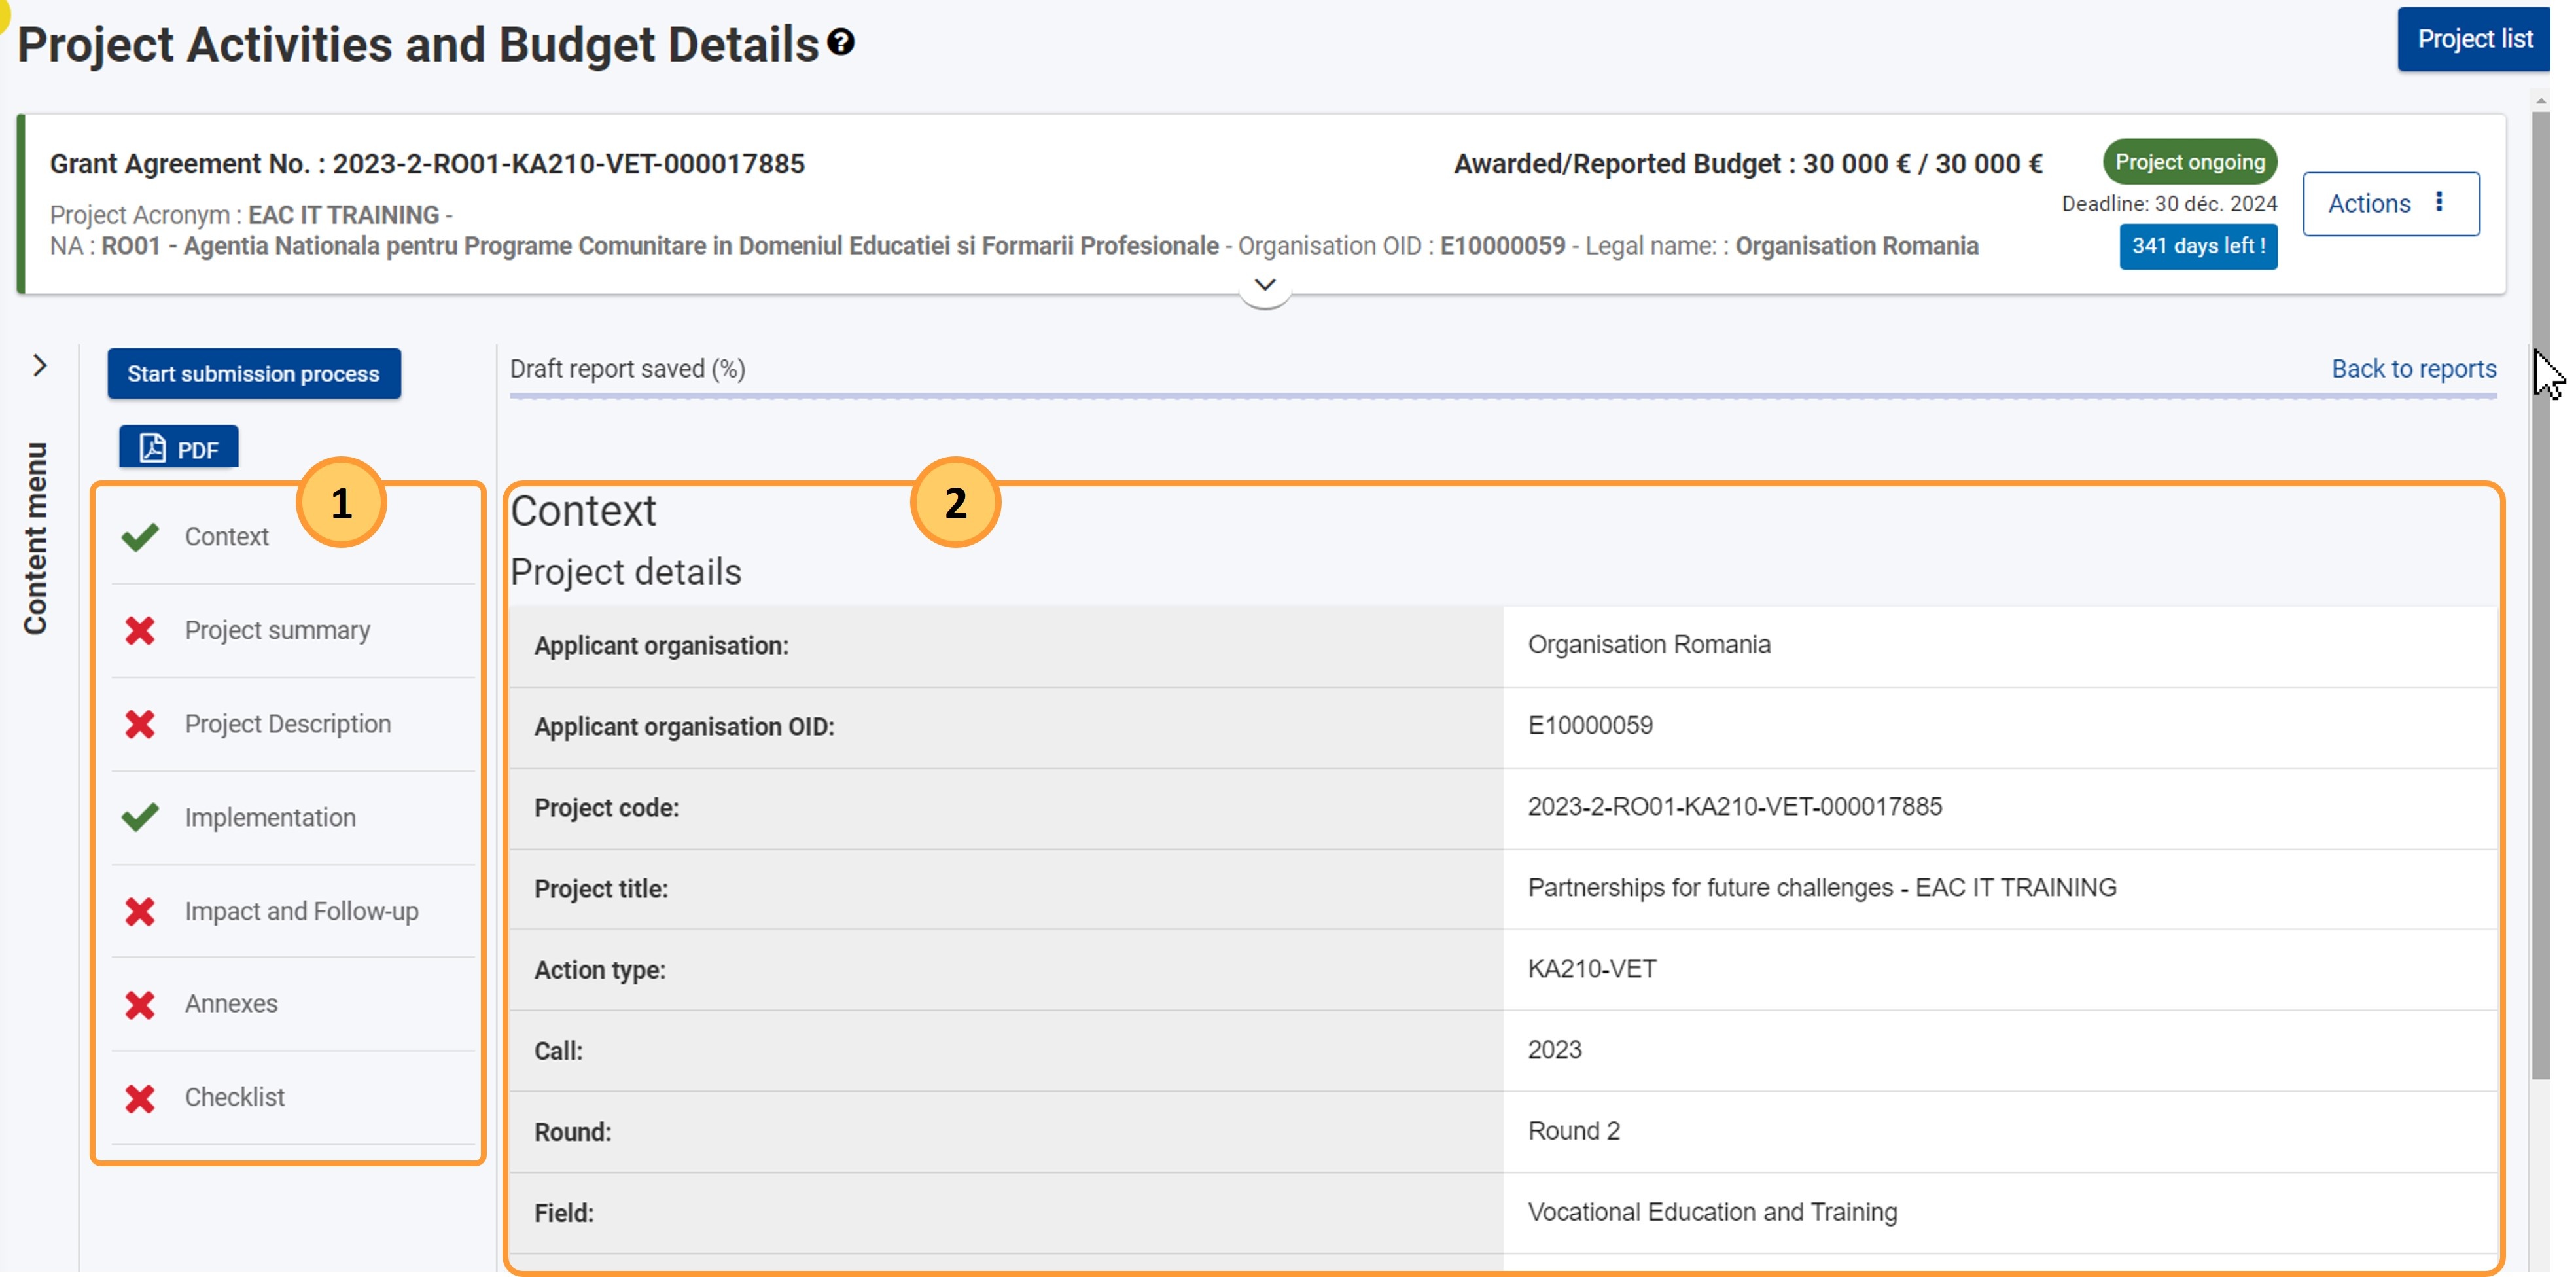
Here is an example of the report form for a KA210-VET Periodic report. The navigation menu (1) and the content/work area (2) are available. The options available in the navigation menu are different than for the KA220 report.
Please also consult the report templates available at the bottom of this page for the details of each report, per action type.
Before you start filling in the report, please familiarise yourself with the basic report functionalities explained on page Basic functionalities in report forms in beneficiary projects.
You will notice that the Context section is already filled in and marked with a green check. It contains general information that is also displayed in the Details section of the project, and it cannot be modified.
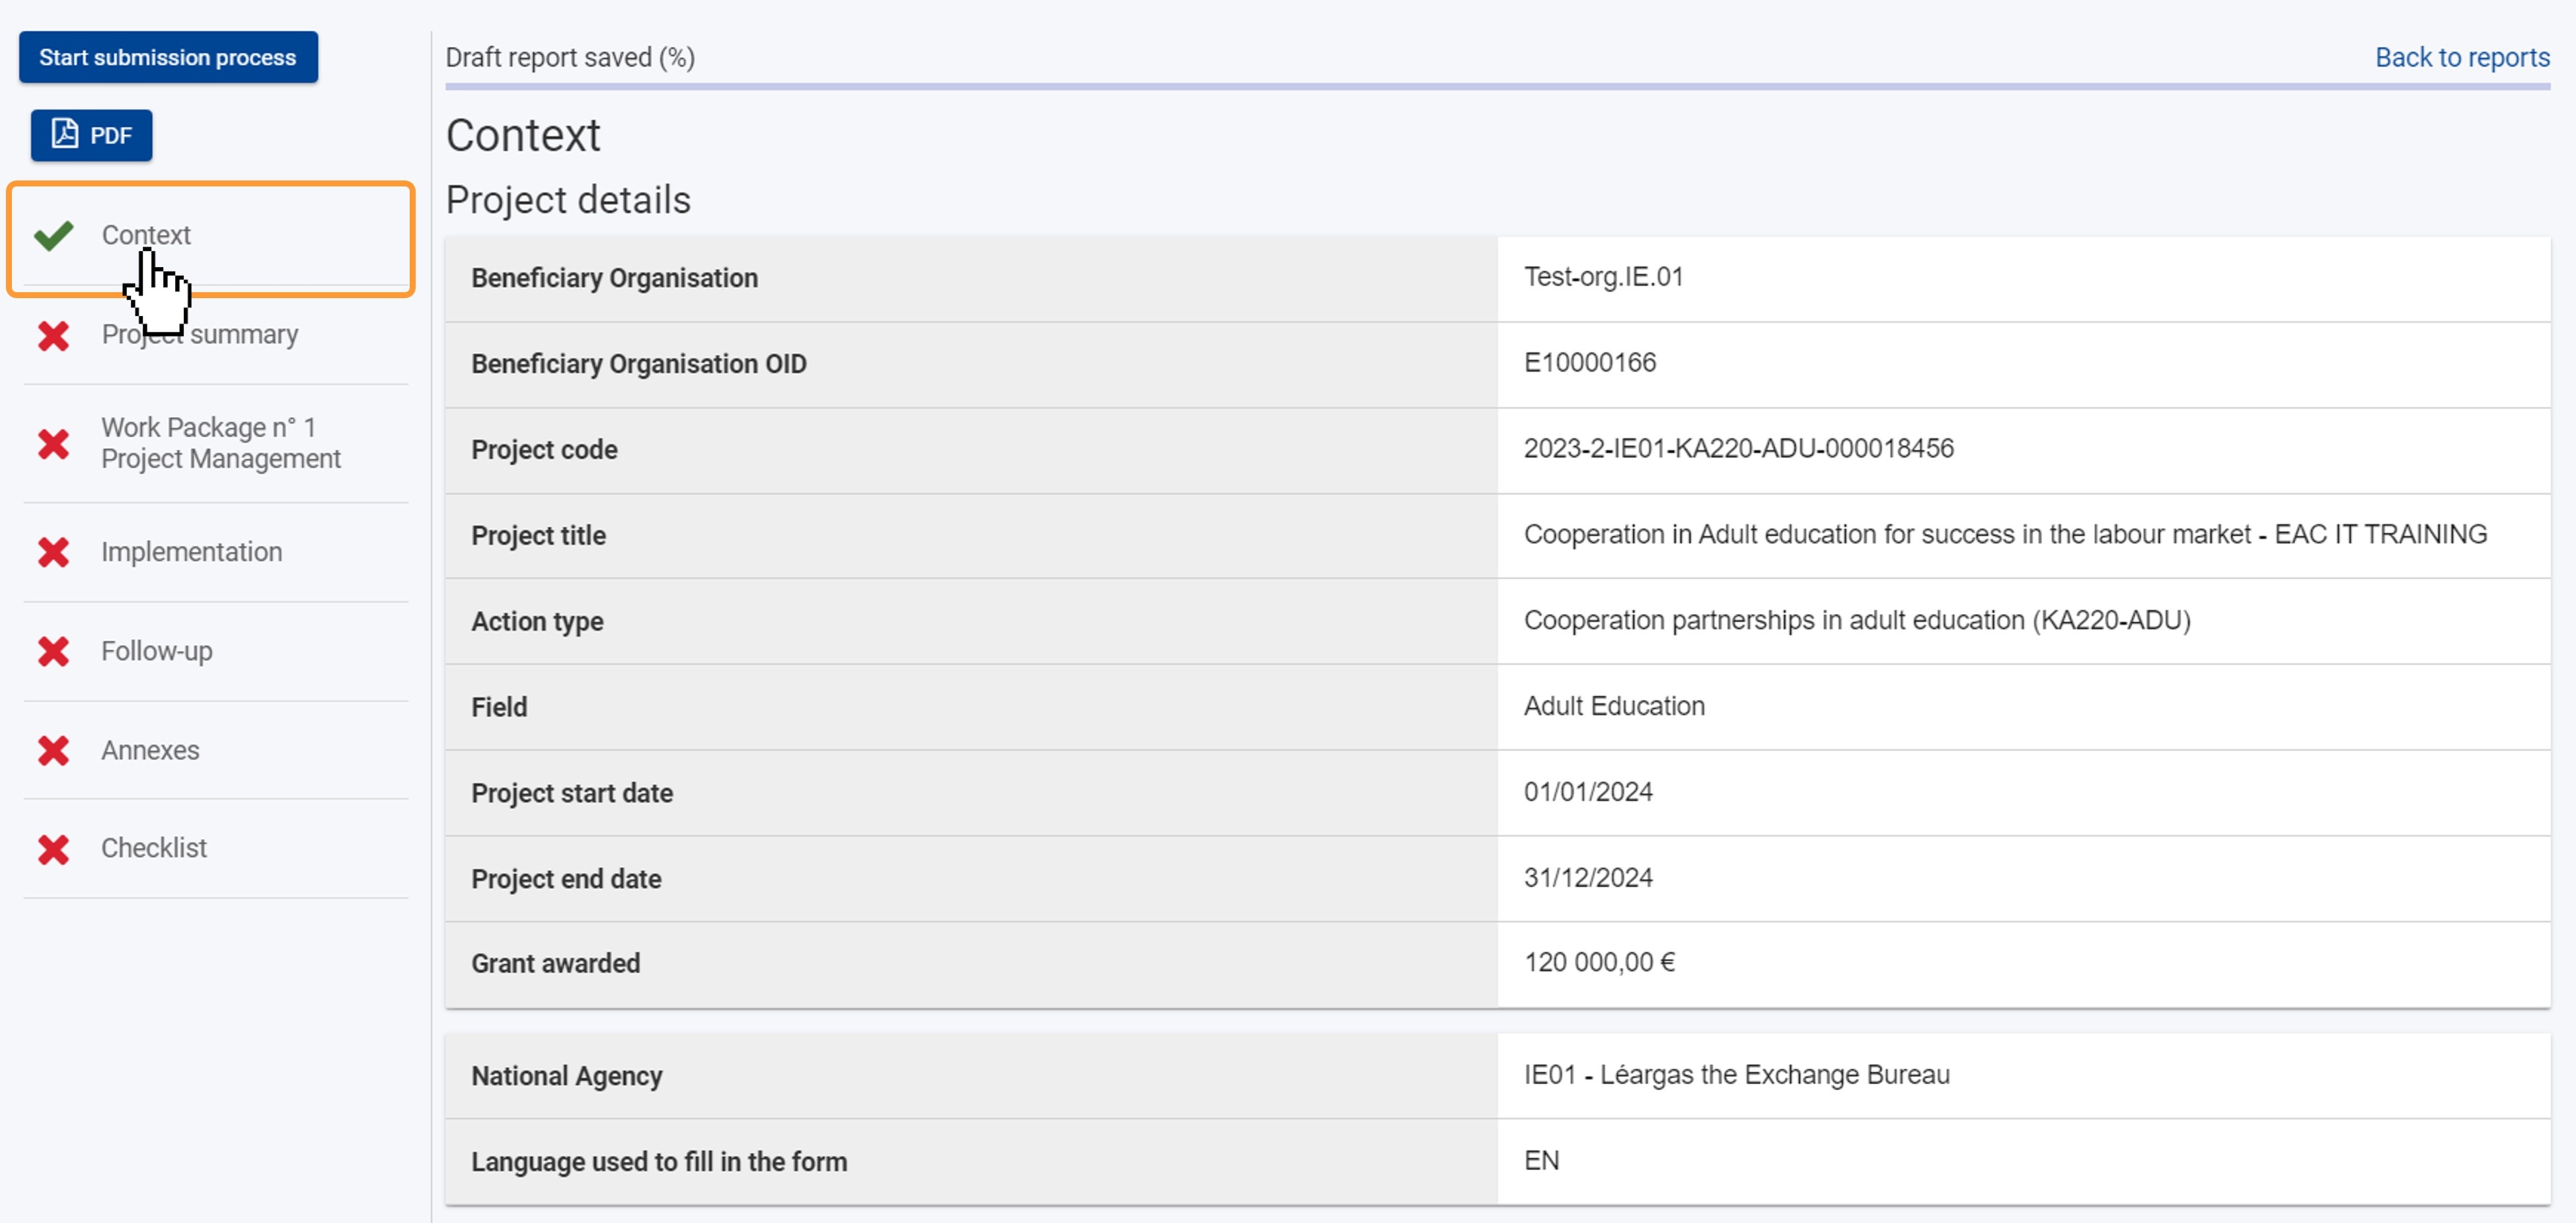
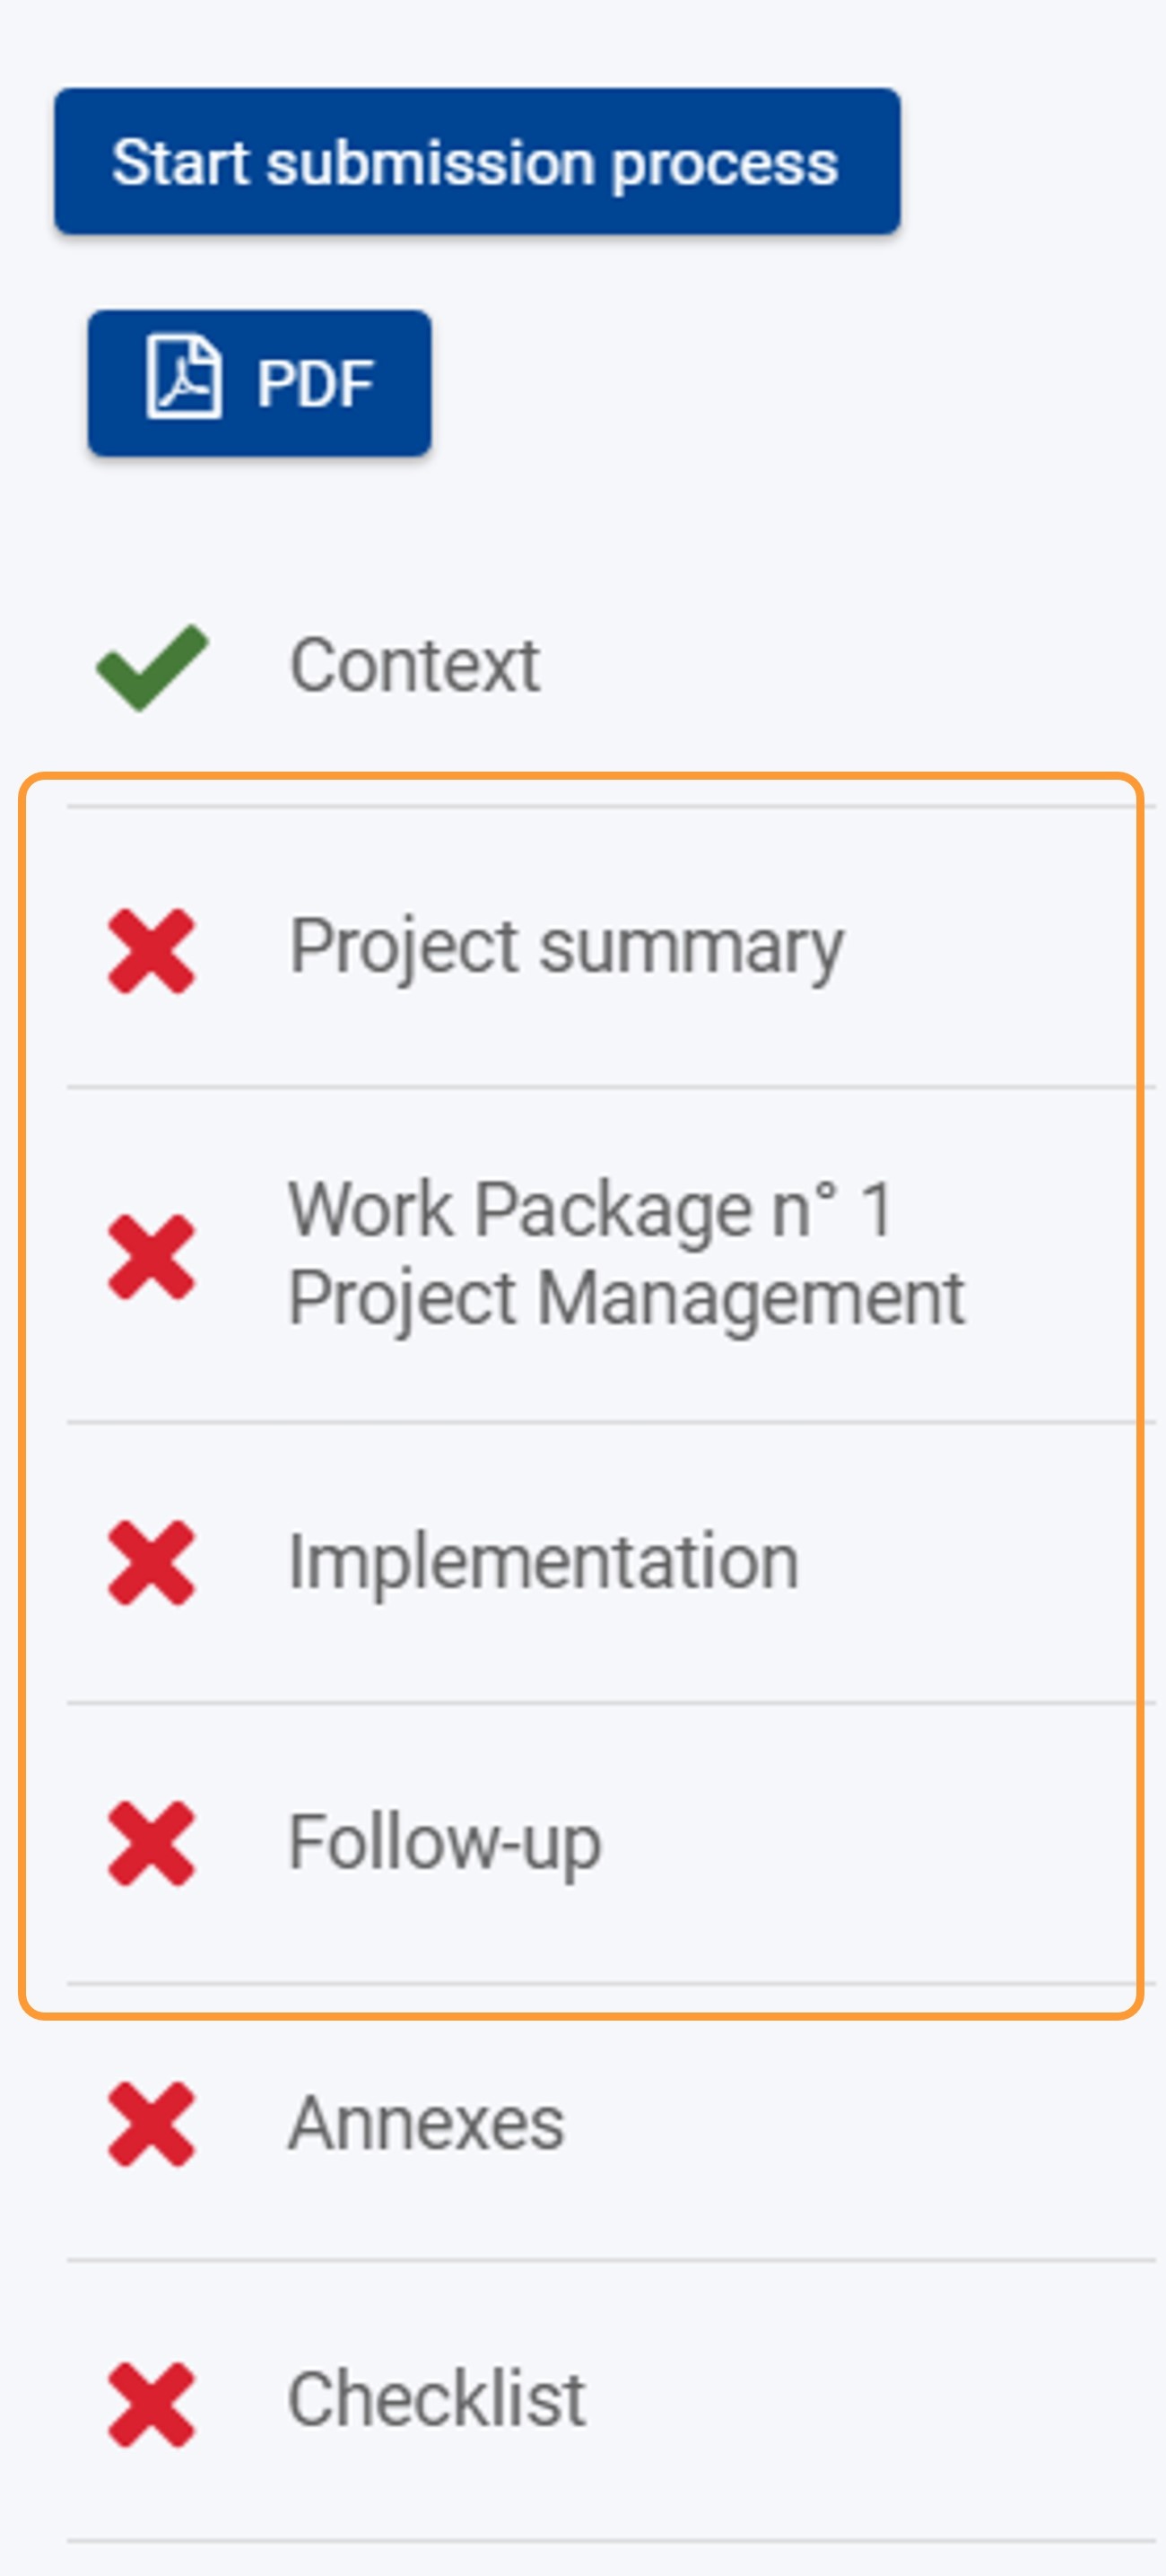
Use the navigation menu to access the various sections in the report and provide the required information, as applicable. Once a section is completed, it will be marked with a green check in the navigation menu, indicating completion.
In our example, a KA220 project, the following sections are available and must be completed:
Please note that if you have used less than 70%, the further pre-financing will be reduced (see conditions in the grant agreement – Article 22.3.1).
The Annexes and Checklist sections are available for all reports.
Please also consult the report templates available at the bottom of this page for the details of each report per action type.
This example shows the fields to complete in the Project summary section for a KA220 report.

Here is an example of the Financial statement subsection, part of the Follow-up section of the report. You can request a further pre-financing payment, if needed. The field Amount of Pre-financing payments already received is prefilled as per payment information registered in the National Agency's project management system.

Take note
Add the "Declaration on Honour"
To add the Declaration on Honour:
Take note
According to the national context, a signature by the legal representative of the beneficiary organisation may not be sufficient and a stamp for the organisation may also be required.
 Add Other documents
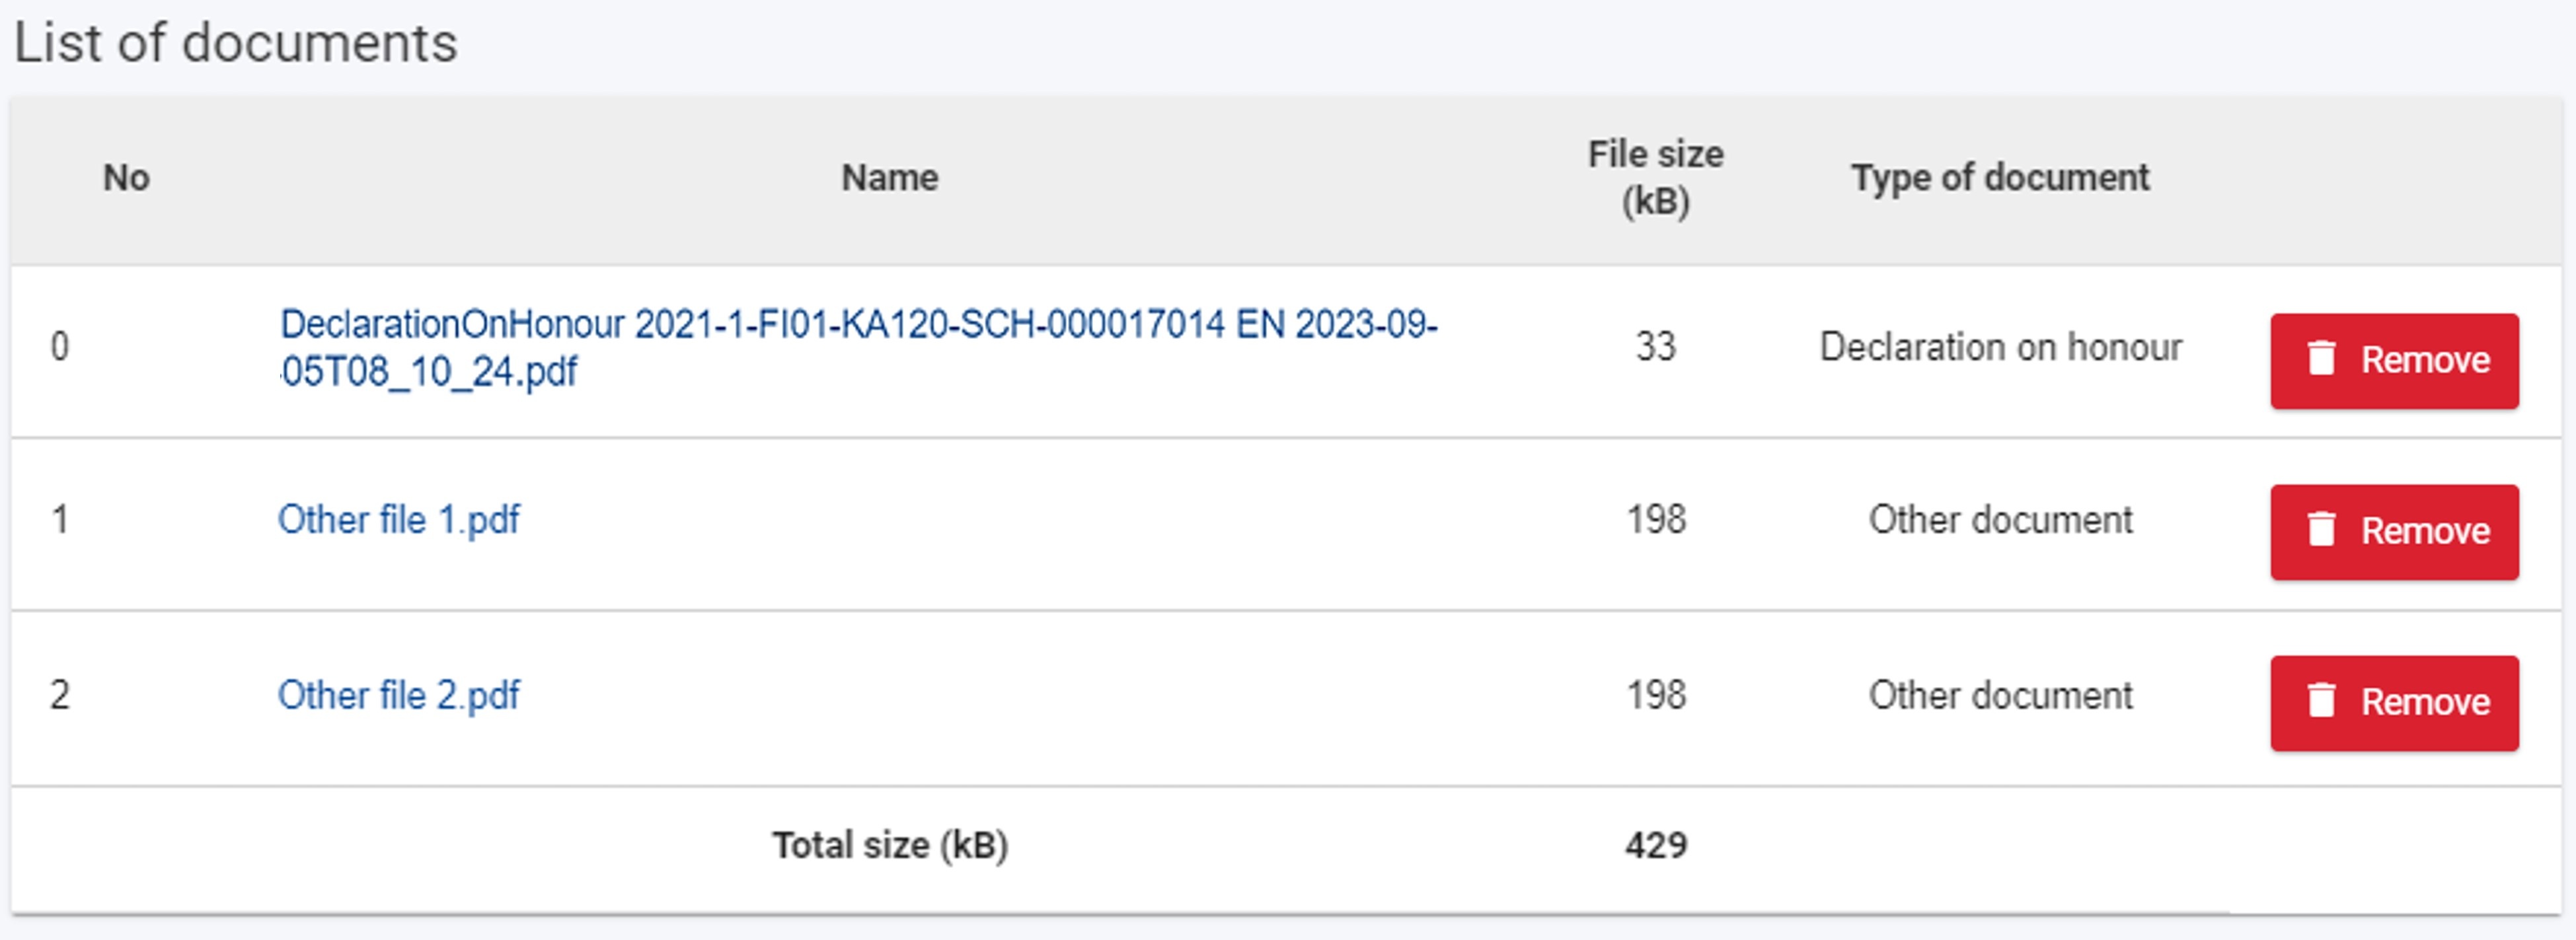
Attach any other relevant documents, using the Add documents button. Follow the onscreen instructions to locate and upload the desired documents. The files will be available in the List of documents.

List of documents
In the List of documents you will view all the files you have attached. The Declaration on Honour is marked so you can identify it easily.
Take note
Read the onscreen information carefully and make sure you observe the rules regarding the allowed file types, the maximum file sizes and the maximum number of documents attached. These are mentioned at the top of the Annexes section.
The files are numbered and listed in the order in which you have attached them. You can view the size of each file, as well as the total size of all annexes. If you want to delete a file from the list, click on the Remove button next to the desired file, then click on YES in the confirmation pop-up window to confirm the deletion.
Ensure you have performed all the actions listed in the checklist, and tick the boxes accordingly. All items on the list must be ticked in order to submit the final report.
Remember that the submission of the report will be blocked if an import of mobility activities in the project is in progress.
Check the list and make sure all conditions are fulfilled, i.e. all checkboxes are ticked. If one or more of the conditions are not fulfilled, you need to make the necessary changes, before you are allowed to submit the report.
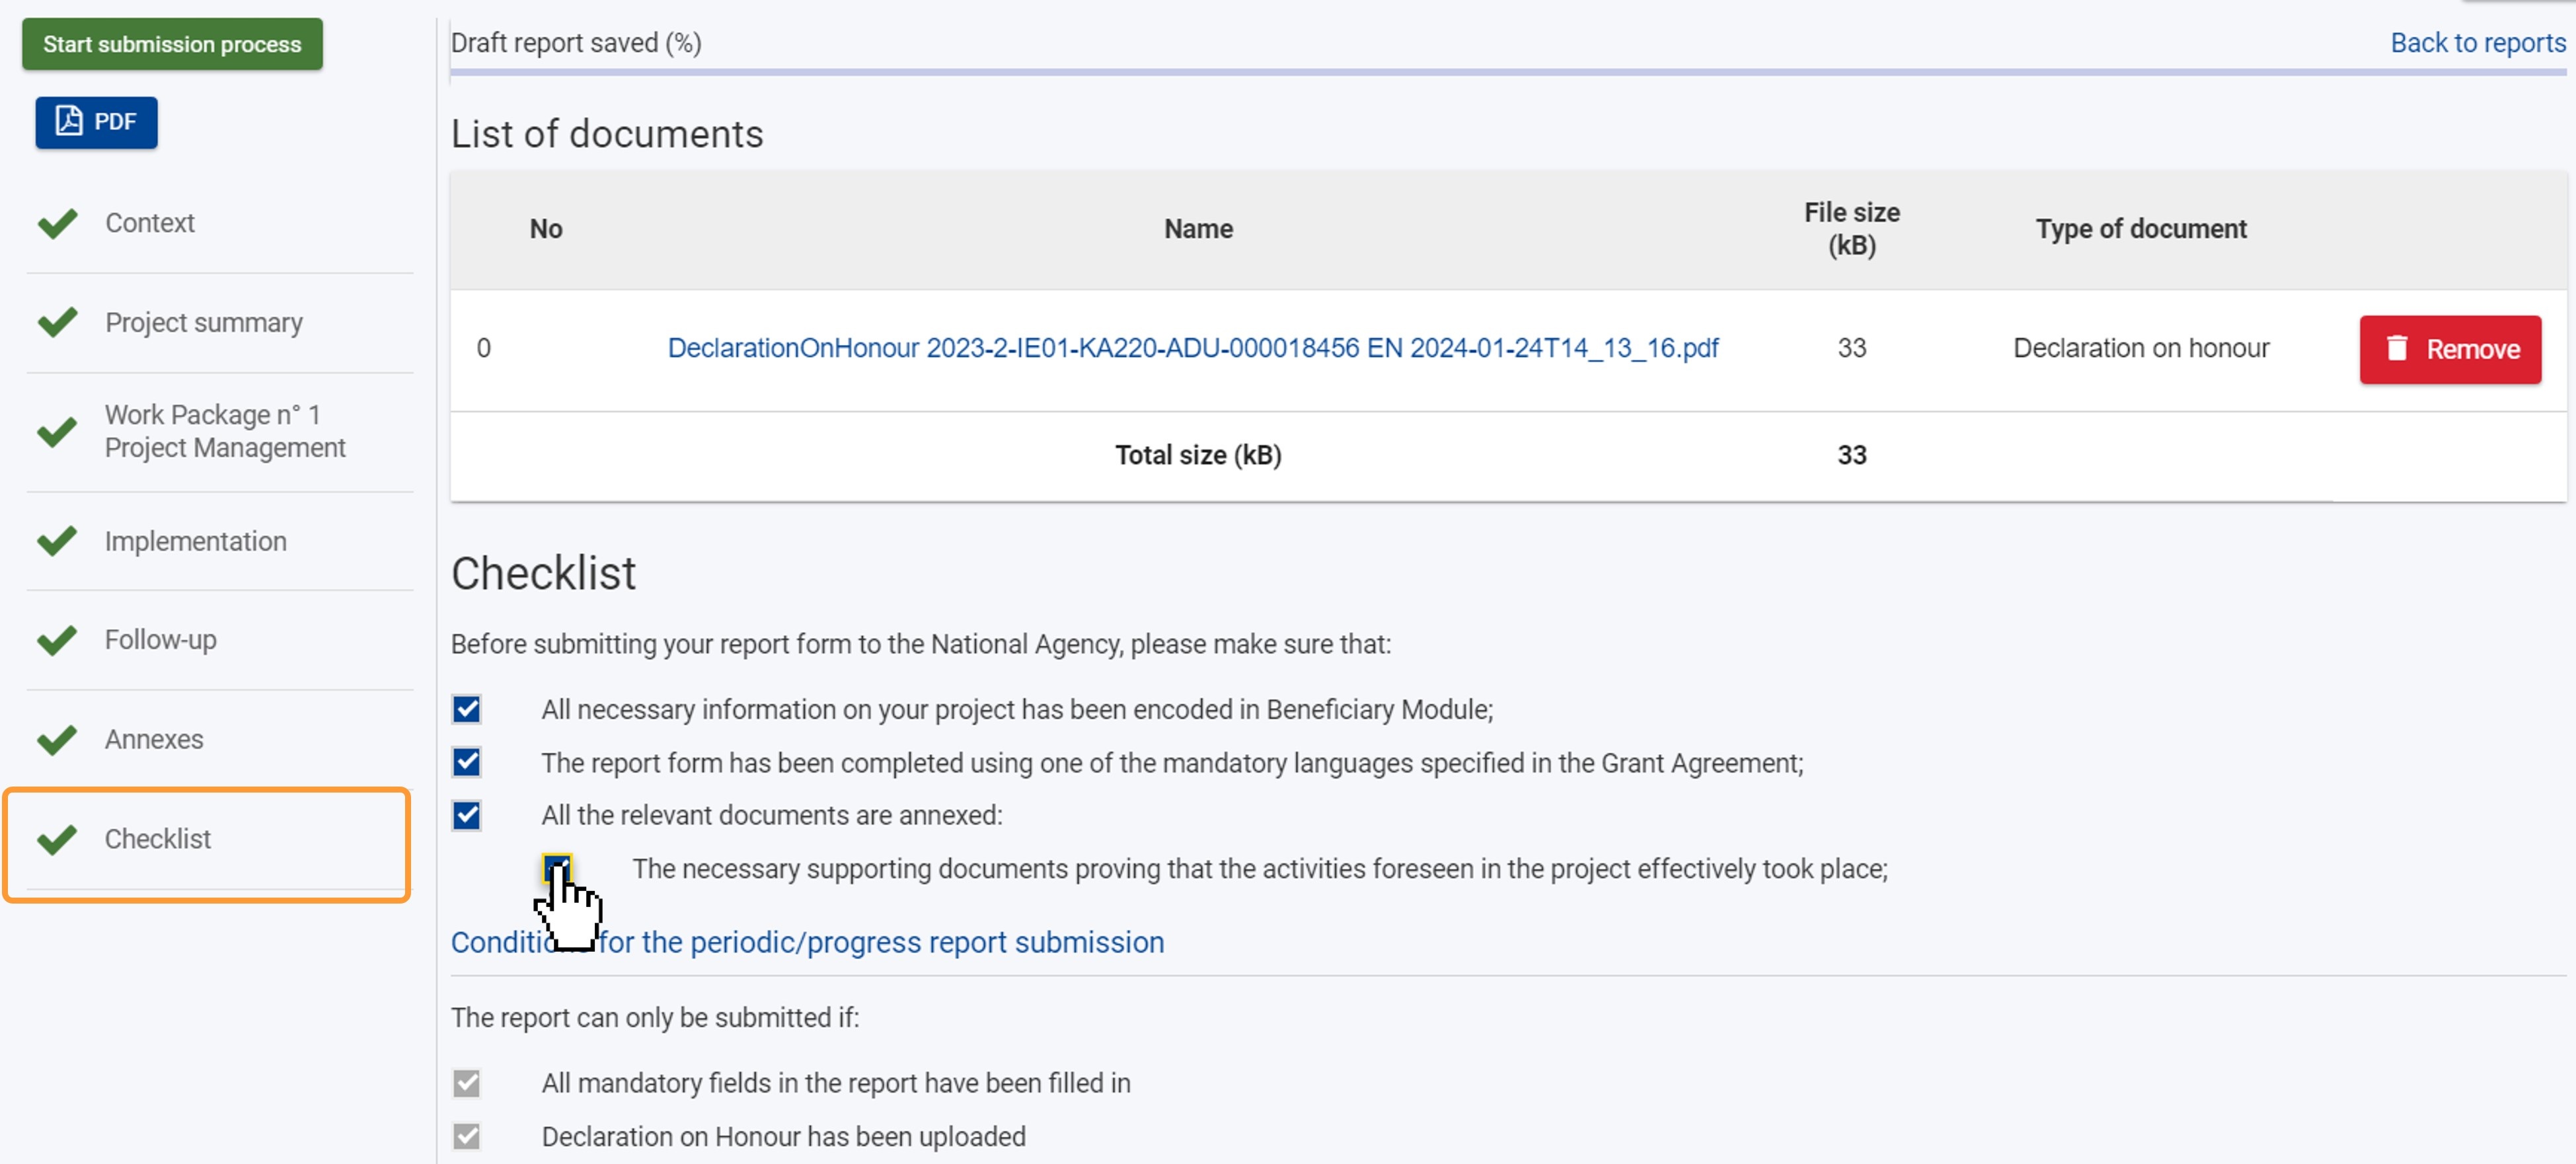
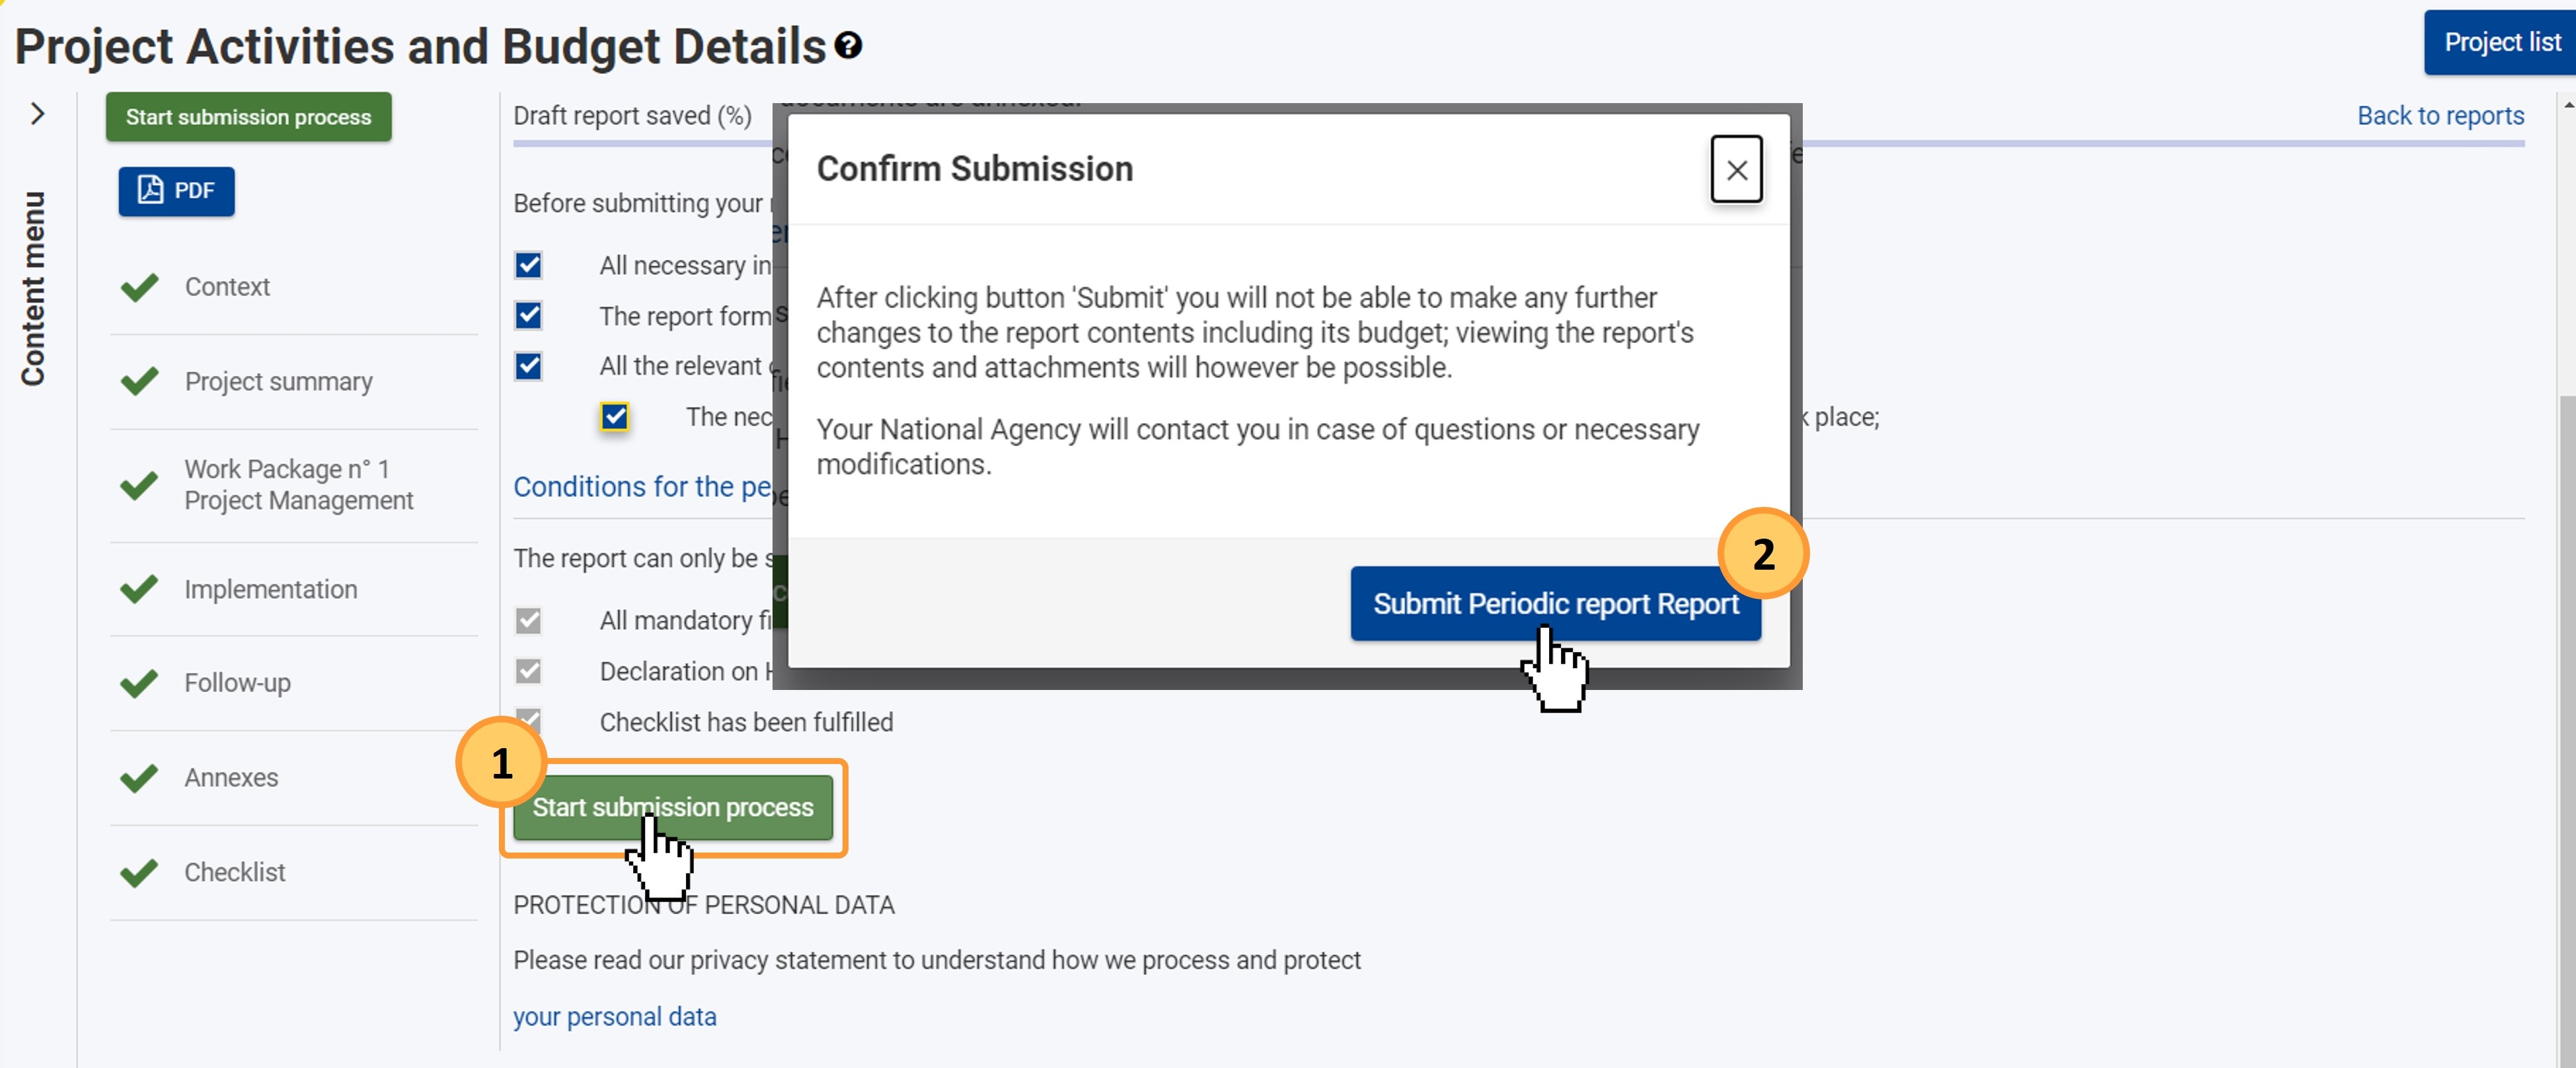
The Start submission process button is available at the top of the screen, in the Navigation panel, and at the bottom of the screen, under the Conditions for the report submission. It is only active if all conditions for the report submission are fulfilled.
Click on the Start submission process (1) button, read the information in the pop-up window, then click on Submit periodic/progress report (2) button to confirm the submission.
Once the report is submitted:
Here is an example of the Reports screen, after successful submission of the report, while the submission is in progress.

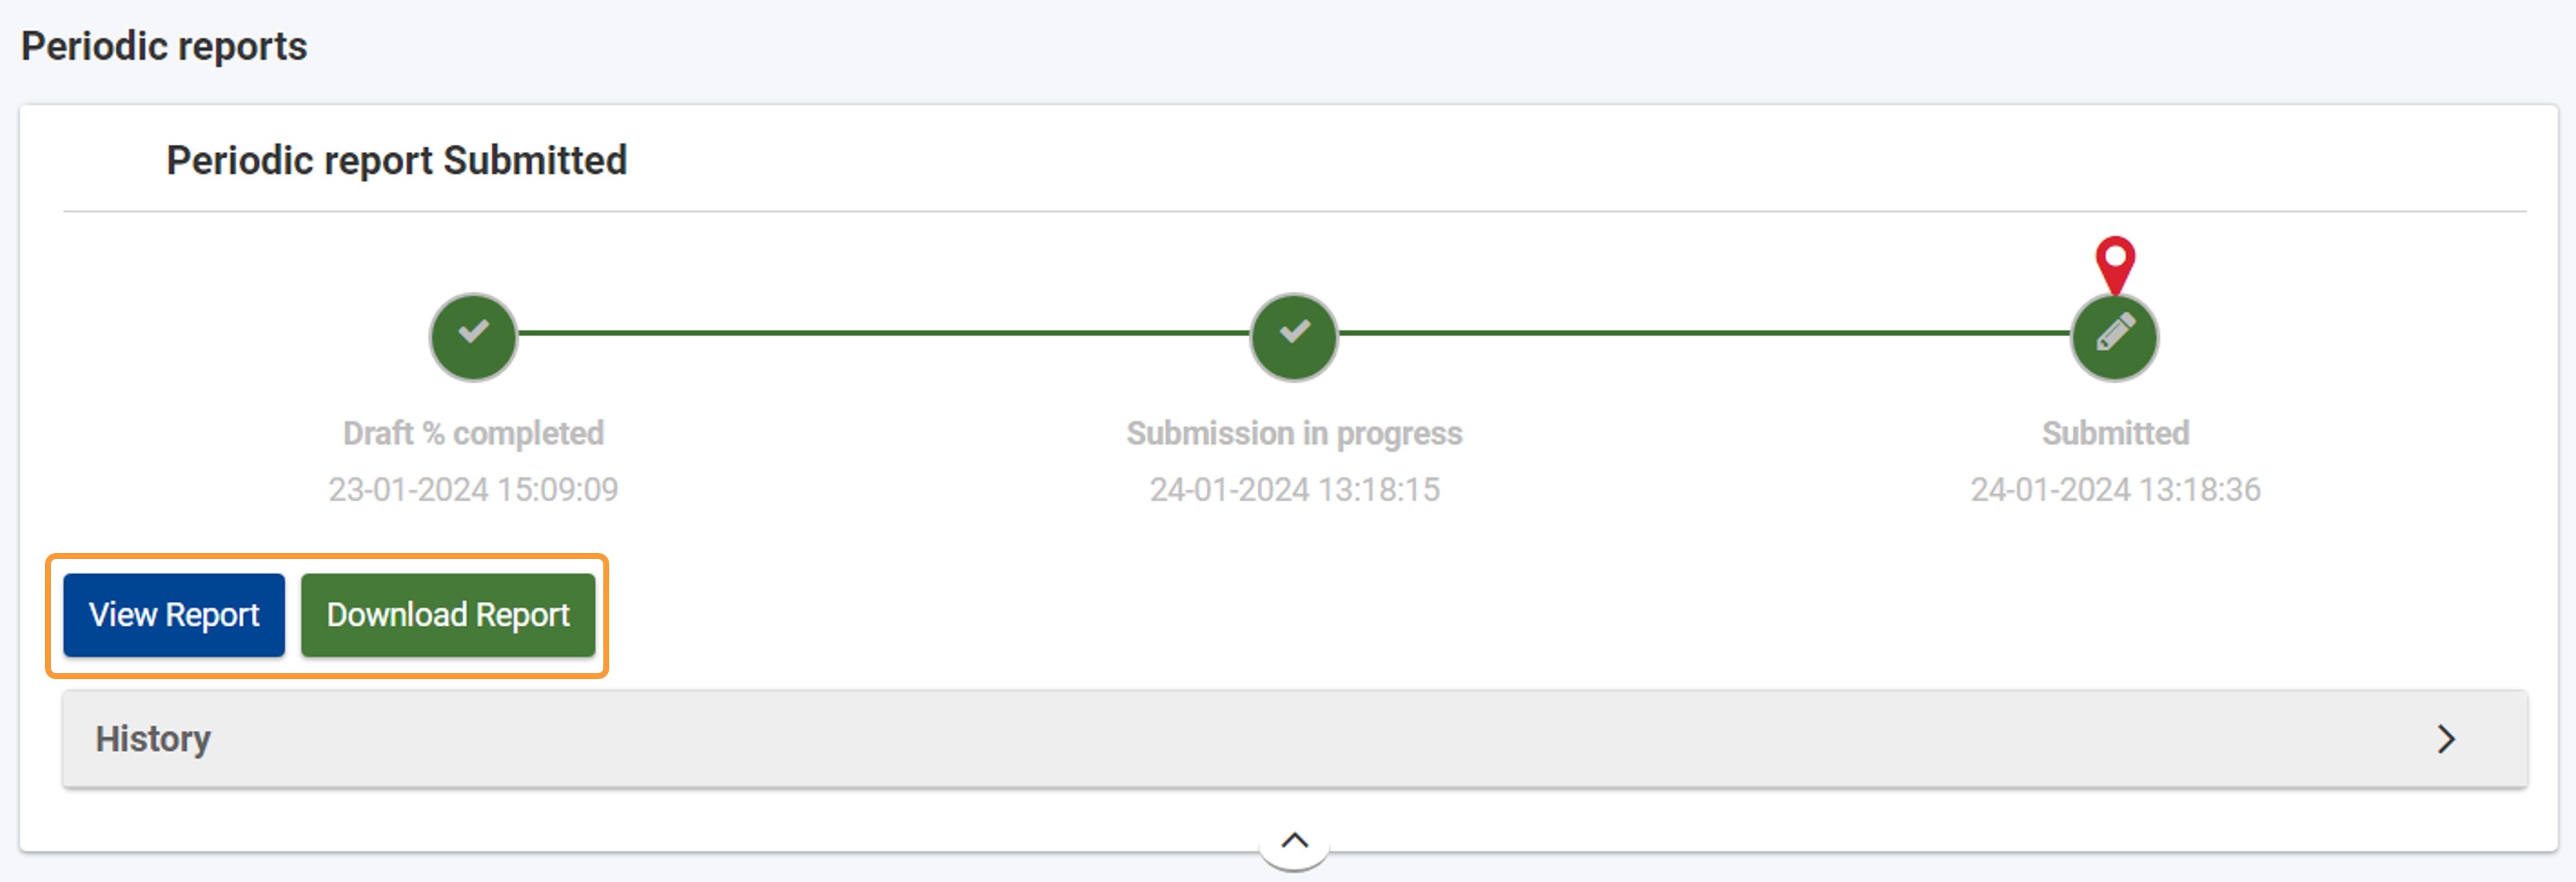
Here is the example when the report was successfully submitted to the National Agency. The timeline is updated accordingly.

You can still access the report after submission, but you cannot make any further changes.
Click on the View Report button to view the report on the screen, or click on Download Report to export a ZIP folder including the report as a PDF file and all annexes submitted with the report. You may need to install an external tool to extract files from the ZIP folder.
If the report was cancelled by the National Agency after it was submitted, the status of the report will change to Cancelled. A notification email is sent to the beneficiary contact, informing them of the cancellation of the report request. Only if the NA requests a new report will you be able to generate a new one.
Here is an example of the updated timeline where the submitted report was cancelled by the NA in their project management system. The report status is updated accordingly and you can still View and Download the report. You cannot make changes to the report and resubmit it.
The National Agency checks that all necessary information submitted in the report is available and/or satisfactory. If not, an update for the report will be requested. Reasons for requesting a new report may be missing documentation or insufficient information provided in (a) section(s) of the report. In such a case, a new instance of the report is created as a copy of the previously submitted one. A notification email is sent to the beneficiary contact, informing them of the request to revise the report.
Click on the report specific tab in the Content menu. If a new version of the report was requested by the NA, the Edit Draft button will be available.
In the History, an information message informs you that all answers from the previous report have been copied into this report. Click on the Edit draft button to open the report.
The Edit draft button will be available in the specific reports tab of your project.
The report opens in draft status.
All information submitted with the previous version of the report is available. All items, except the Annexes and Checklist, are marked with a green check. The annexes from the previous version of the report are not available and new annexes must be attached.
You can update information in the various report sections, if and where required.
All previously attached documents, including the Declaration on Honour, are no longer available and must be re-attached before you can submit the new version of the report. See above for step-by-step instructions.
When all information in the report is complete and the documents are attached, tick the various items in the Checklist. See above for details.
The Start submission process button is available both at the top of the screen, in the Navigation panel, and at the bottom of the screen, under the Conditions for report submission. It is only active if all conditions for the report submission are fulfilled, as explained above. See above for additional details.
Click on the Start submission process button, read the information in the pop-up window, then click on Submit Report to confirm the submission. The report process will continue as explained in step Report is "Submitted".
The report is received by the National Agency, and will be assessed by experts. For more details on how the reports are processed, please see the page Interim, Periodic and Progress Reports in Beneficiary module.
KA210 - Small-scale partnership KA220 - Cooperation partnerships KA210 - Small-scale partnership KA220 - Cooperation partnerships KA210 and KA220 periodic/progress report templates
Call KA Template 2023
2024
Contact
Legal Notice![]() |Processing personal data | Cookies
|Processing personal data | Cookies![]() | Powered by Atlassian Confluence
| Powered by Atlassian Confluence![]()