Data Explorer (Eurostat legacy data application) provides a bookmark feature. Using this feature, it is possible to create bookmarks. In Data Browser (new Eurostat application), this feature also exists. It is quite easy for anyone to convert a Data Explorer bookmark into a Data Browser bookmark. This page explains, step by step, how to do it.
In this help page, the current Data Explorer bookmark will be used as an example.
Step 1: Finding the dataset
The first step is finding the appropriate dataset in Data Browser.
Open Data Explorer bookmark in a web browser. At the upper right side of the page, the dataset’s code is displayed:

Open Data Browser and search for the aimed product.
Step 2: Setting the time selection mode: URL / create custom
In Data Explorer, when creating a bookmark, it is possible to determine how the bookmark should behave towards the TIME dimension. Three modes are available:
Static bookmark
Rolling time bookmark
Fixed time bookmark
This step consists of two sub-steps.
First, determine the selection mode which applies to your Data Explorer bookmark. Within the URL of the bookmark, the "time_mode" parameter may have three different values:
NONE: This is a Static bookmark
ROLLING: This is a Rolling time bookmark
FIXED: This is a Fixed time bookmark
In the provided example, the bookmark URL contains "&time_mode=ROLLING", which indicates that Data Explorer bookmark is a Rolling time bookmark.
Second, in Data Browser, click on the "Create custom dataset" button. The "Define your custom dataset" modal appears:
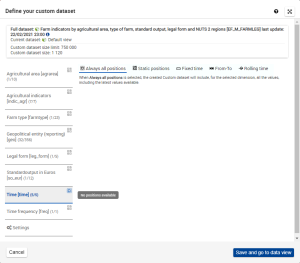
First, click on "Time" dimension (on the left side). Then select the appropriate selection mode (radio boxes in the right part of the screen)
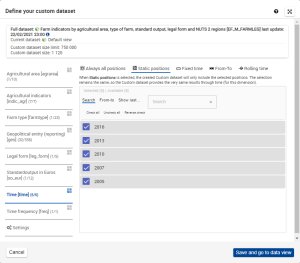
If the "Static positions" selection mode is selected, check the same positions as the ones checked in Data Explorer. To see the list of positions checked in TIME dimension in the Data Explorer bookmark:
Click on the
 button next to the TIME dimension:
In the modal which opens, the selected positions are the checked ones:

Check the same positions in the "Define your custom dataset" popup of Data Browser:
If the "Rolling time" selection mode is selected, select the desired Starting time:

If the "Fixed time" selection mode is selected, select the desired last time positions:

Then, for each of the other dimensions of the dataset, repeat this process:
In Data Explorer: determine which positions are checked.
Click on the "
" button for each dimension and gather the list of checked positions.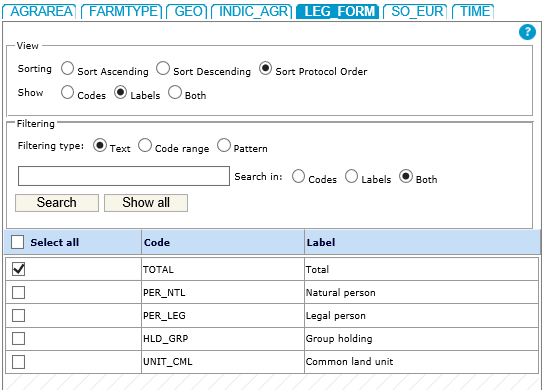
In Data Browser:
In the left part of the "Define your custom dataset" modal, select the dimension
In the right part:
Select the "Static positions" mode
Check the positions according to the ones checked in Data Explorer

Once finished, click on "Save and go to data view". Data Browser appears with the selected dataset, with the selected positions.
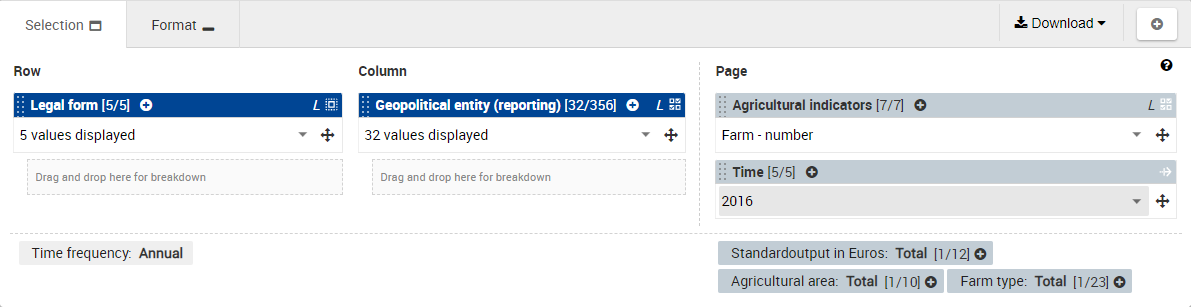
Step 3: Setting the dimensions layout
Next step is to organize the dimensions layout in Data Browser the same way as they are organized in Data Explorer.
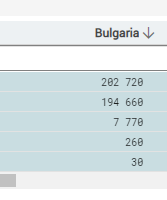
In the example of Data Explorer bookmark, the layout is:
In Columns, the GEO dimension
In Rows, the Legal form dimension.
This layout should be replicated in Data Browser, using the drag-and-drop gesture (see this page). Every dimension which is not in Column nor in Row will be present in the Page section of the layout.
Initial Data Browser layout:
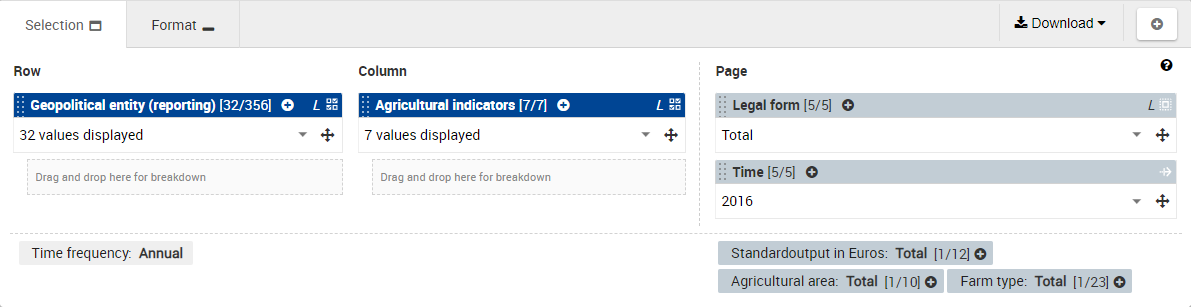
Final Data Browser layout:
Step 4: Statistical data sorting order
It is possible that the statistical data displayed in the Data Explorer is built on a specific sorting order based on one specific column:
Data Explorer sorting order | Data Browser corresponding sorting order | |
Column does not impact sorting order |
|
|
Statistical data is sorted based on this column, in ascending order |
|
|
Statistical data is sorted based on this column, in descending order |
|
|
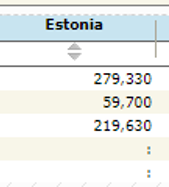
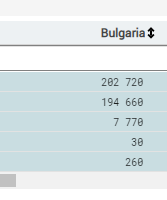


To reproduce this sorting order in Data Browser, click on the arrowed-symbol next to the column label until the desired sorting order is reflected.
Step 5: Setting the format options
The next step is to replicate the format options.
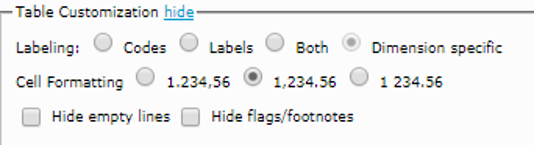
At the top of Data Explorer, click the "show" link located next to "Table Customization"
![]()
It is possible that the "Table customization" is already displayed. If this is the case, the link caption will be "hide".
The formatting options appear:
In Data Browser, the formatting options are present in the "Format" tab:
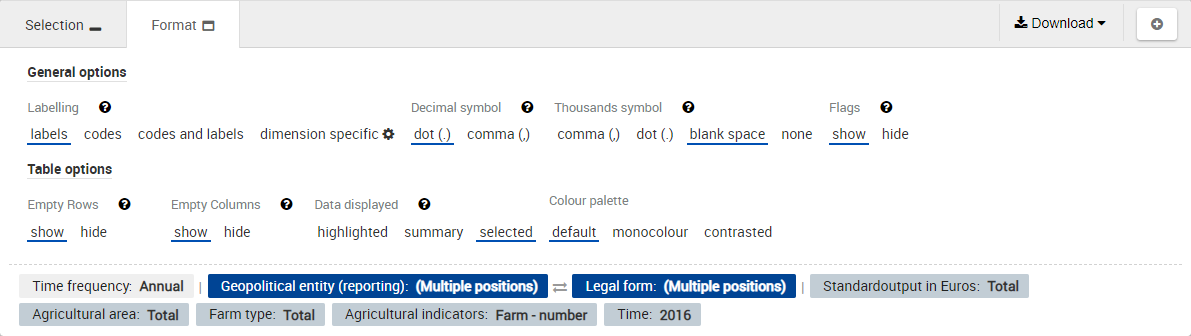
In the sections below, each section contains a table which matches the equivalencies between Data Explorer format options and Data Browser format options. Follow those tables to make your current formatting options in Data Browser match the formatting options selected in Data Explorer.
5.1. Set the Labelling options
Data Explorer "Labelling" field | Data Browser "Labelling" field |
|---|---|
Codes | Codes |
Labels | Labels |
Both | Codes and labels |
Dimension specific | Dimension specific |
5.2. Set the Cell formatting
Data Explorer "Cell formatting" field | Data Browser "Decimal symbol" |
|---|---|
1.234,56 | Decimal symbol: Comma (,) |
1,234.56 | Decimal symbol: Dot (.) |
1 234.56 | Decimal symbol: Dot (.) |
5.3. Show/Hide empty lines
Data Explorer "Hide empty lines" checkbox | Data Browser "Empty Rows" selector |
|---|---|
Checked | Hide |
Not checked | Show |
5.4. Show/Hide flags/footnotes
| Data Explorer "Hide flags/footnotes" checkbox | Data Browser "Flags" selector |
|---|---|
Checked | Hide |
Not checked | Show |
Step 6: Create the Data Browser bookmark
Once Data Browser reflects exactly the Data Explorer bookmark, click on the "Bookmark link" button (see this page). The bookmark link is then created, and can be used normally.