Results & Monitoring |
A Logical Framework is a matrix in which the intervention logic (overall objective, purpose, expected results and activities), assumptions, objectively verifiable indicators and sources of verification are presented. It is used as a management tool to improve the design of Interventions. It involves identifying strategic elements (inputs, outputs, outcomes, impact) and their relationships, indicators, and the assumptions or risks that may influence the success or failure of a Project. It thus facilitates planning, execution and evaluation of a development Intervention, and is therefore present and used in different phases of the cycle of operations.
In OPSYS, we identify the Logical Framework Matrix (LFM) as a Logframe, which is attached to an Intervention.
As an Implementing Partner or Expert, it is required to create and/or update the Logframe of an Intervention that has been assigned to you by adding the Results, creating Indicators, and adding their Values.
A Logframe (once created by an OM, LIP or IP) – at Intervention-level – is accessed from the Intervention. The permission must first be granted to the user for the Intervention (by the OM for the LIP; or by the LIP for the IP) before they can access or create a Logframe for the Intervention – for detailed access information, please view Cooperating with Implementing Partners or Experts.
To access a Logframe, first login to the Funding & Tenders Portal, and then select My Intervention(s) from the left main menu (1).
On the My Intervention(s) page click on the Intervention ID link (2) in the list of Interventions.

On the selected Intervention page, click on the “View Logframe” button to view the Logframe.

Please note that if the Logframe is in “Draft” status (i.e. not yet submitted for review nor approved), the draft Logframe can still be edited or submitted for review from the Logframe page (view Logframe). |
If the “View Logframe” button is not displayed on the Intervention page, then there is no Logframe attached to the Intervention. A Logframe needs to be created first for the Intervention before it can be accessed – please view the next section for more details on how to create a Logframe.
Logframes can also be accessed directly from:
![]()
A Logframe can be created by the Operational Manager, Lead Implementing Partner, or Implementing Partner of the Intervention.
Watch the video on how to create a Logframe. |
To create a Logframe, first login to the Funding & Tenders Portal, and then select the Intervention from My Intervention(s) as instructed in the previous section.

The “MANAGEMENT MODE” on the Logframe page is activated, a Logframe in “NEW” status is created, and you can either:
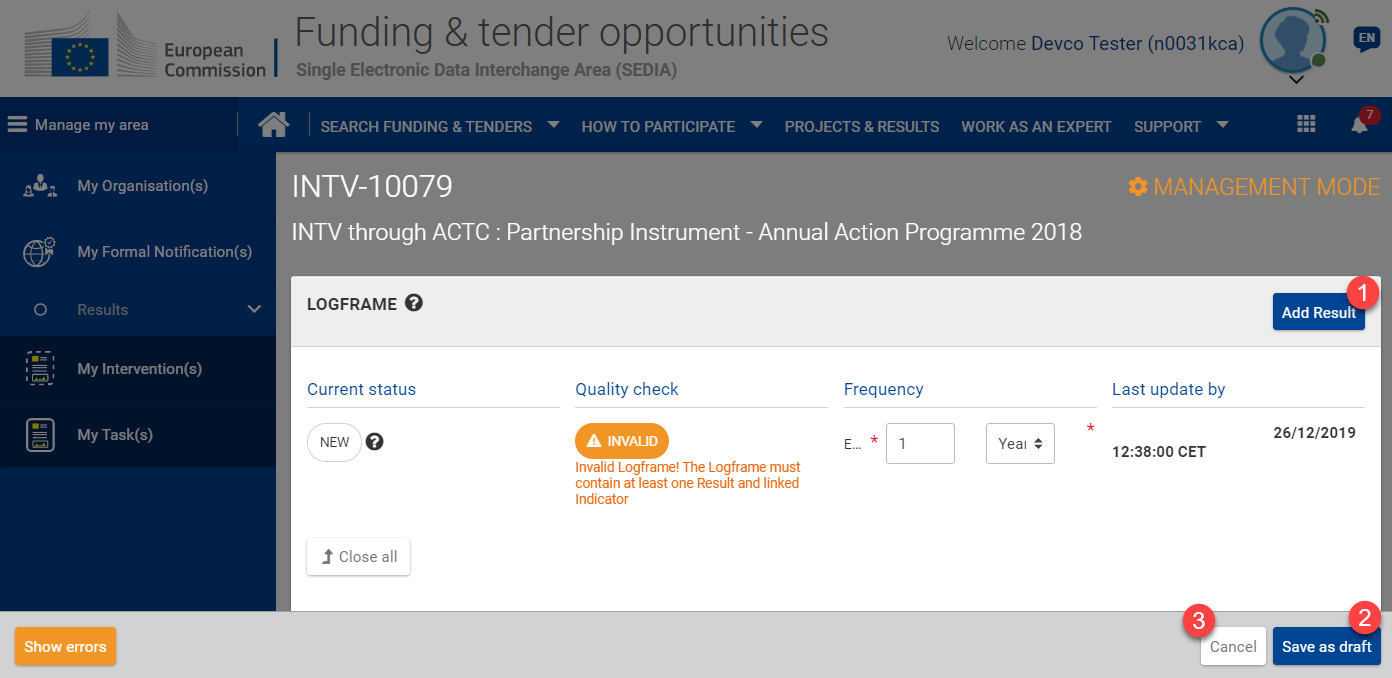
When you have saved the draft Logframe (with or without adding a result), you can still edit the Logframe before submitting it for review via the “Manage Logframe” button on the Logframe page.
An automated Quality Check by the system is applied to the Logframe and its components (Results and Indicators) as soon as it is created, and is applied continuously as modifications or updates are applied (i.e. create or manage Logframe and components - “Management Mode”).
The status of the Quality Check can be either “OK” (in green) or “INVALID” (in orange), and the validation is achieved when:
The Quality Check (1) of the Logframe will display a validation message (2) to inform the user if the Logframe is “INVALID”. A “Show errors” (3) button is also displayed at the bottom left of the screen, which when clicked, will display the section(s) that are invalid (i.e. Logframe, Result and/or Indicator level).
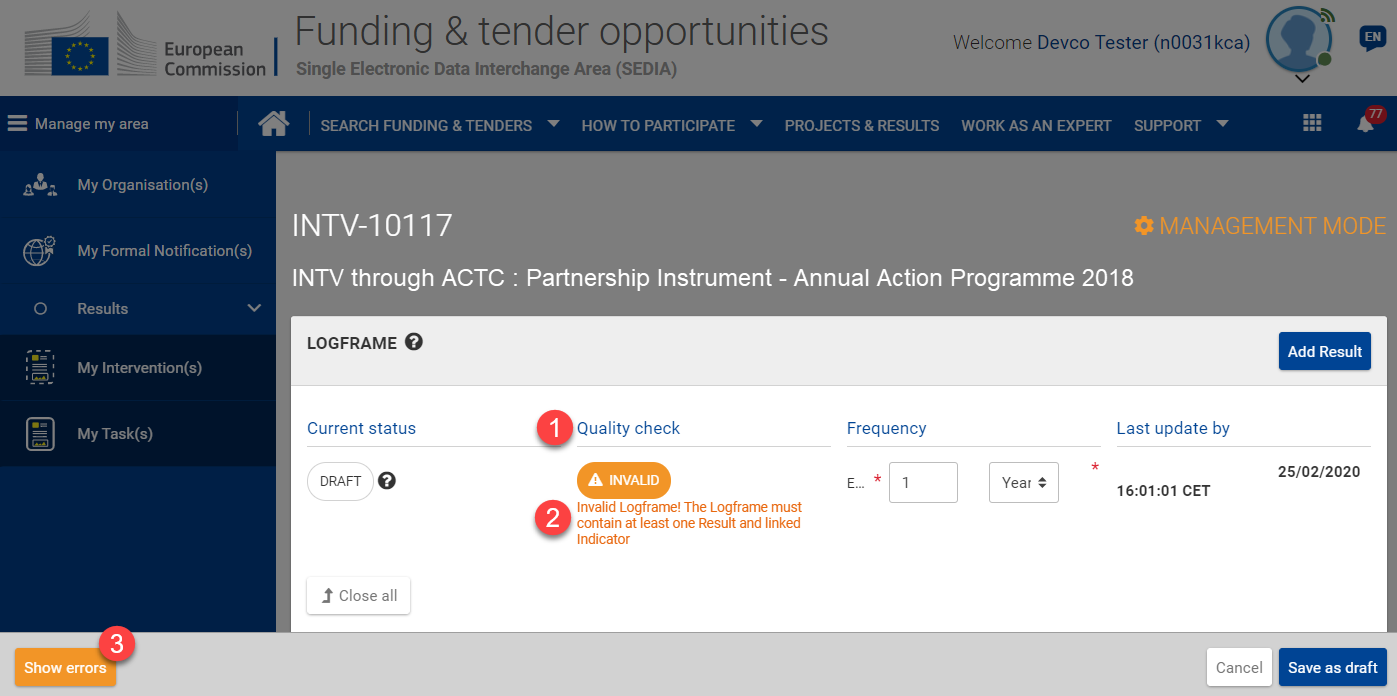
Validation messages are also displayed at the level of the Result(s) and Indicator(s) if they are invalid.
Once created, a draft Logframe can be modified and saved by the Operational Manager, Lead Implementing Partner, or Implementing Partner of the Intervention.
Please note that a Logframe can no longer be modified if it has been submitted for review by the Lead Implementing Partner, or has been approved by the Operational Manager. |
To edit a Logframe first access the Logframe as described in Chapter 4.1.1.1 – How to access a Logframe.
When on the Logframe page, click on the “Manage Logframe” button, and the Logframe is displayed in “MANAGEMENT MODE”.

In “MANAGEMENT MODE”, you can either:
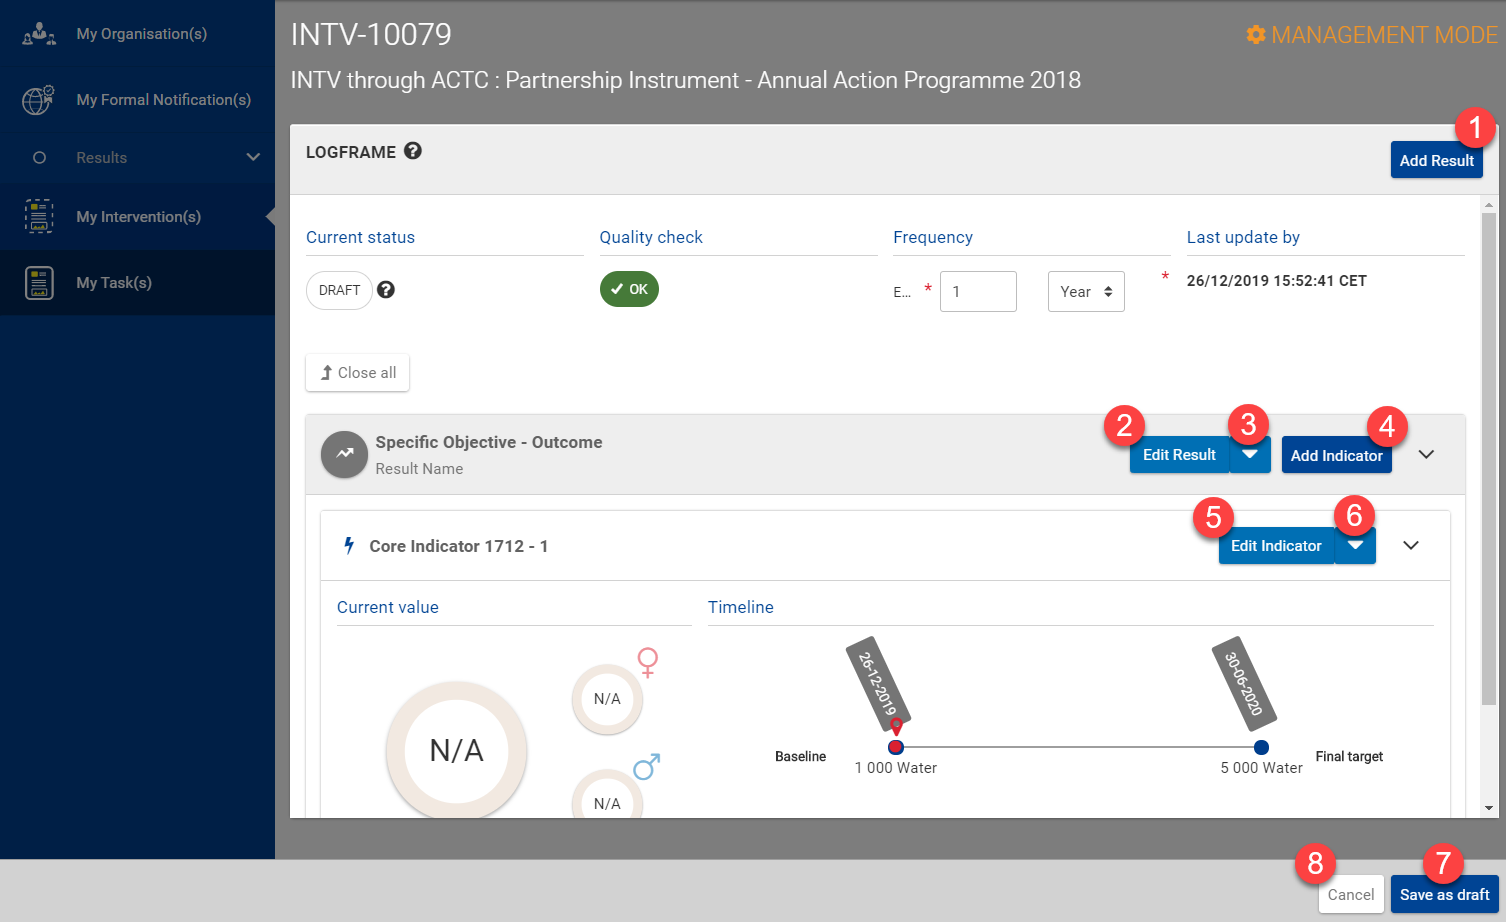
Once created, a draft Logframe can be modified and saved by the Operational Manager, Lead Implementing Partner, or Implementing Partner of the Intervention.
When in “MANAGEMENT MODE” on the Logframe page (see previous section) click on the “Save as draft” button to save any modifications (e.g. add result or indicator).
Once created, a draft Logframe can only be submitted by the Lead Implementing Partner or Contractor to the Operational Manager of the Intervention for review and approval.
|
To submit a Logframe first access the Logframe as described in Chapter 4.1.1.1 – How to access a Logframe.
When on the Logframe page, ensure that the required Indicators (including Baseline and Target) are correctly encoded for each Result of the Logframe.
Once you are satisfied with the structure of the Logframe (Results and Indicators), click on the “Submit Logframe” button (only displayed if the Logframe is in “draft” status), and a confirmation pop-up window will display requesting you to confirm the submission of the Logframe for review.

Upon confirmation, a notification is sent to the Operational Manager of the Intervention, requesting them to review and approve the Logframe (if verified and correct), and the status of the Logframe is updated to “Pending for approval”. No modifications are allowed to the Logframe whilst it is pending approval.
Reminder: Only the Lead Implementing Partner or Contractor can submit a Logframe for approval to the Operational Manager, even if the Logframe was created and saved as draft by an Implementing Partner or Expert |
If the Logframe has been submitted for approval, the Operational Manager may require that the Implementing Partner reviews the Logframe – please view Review Logframe for more details.
The Logframe cannot be modified by the Implementing Partners, including the Results, Indicators and Values, while it is “Pending for Approval”.
|
To print a Logframe first access the Logframe as described in Chapter 4.1.1.1 – How to access a Logframe.
Once you have accessed the Logframe, click either on the print icon (1), or the “Intervention Logic” (2) button.

The Logframe is displayed in “REVIEW MODE”, and you can click on the “Print” button at the bottom right of the page to print the Logframe.
Only Operational Managers can delete the Logframe of an Intervention. |
The Operational Manager must first access the Intervention in OPSYS – MyWorkplace, either from the Dashboard > My Portfolio, or from the main left menu Portfolio > My Portfolio option in the quick filter.
On the selected Intervention page, click on the “Menu” button (1), and then click on the “Delete Logframe” button.

In the Delete Logframe pop-up window, click on the “Continue” button to confirm the deletion of the Logframe.

Important note: If a Logframe has been deleted, it can no longer be recovered! |
Results are managed via the Logframe of an Intervention. Results can be created, modified and saved by the Operational Manager, Lead Implementing Partner, or Implementing Partner of the Intervention.
Watch the video on how to add a Result. |
A Result (once created by an OM, LIP or IP) – at Intervention-level – is accessed or created from the Logframe of an Intervention. The permission must first be granted to the user for the Intervention (by the OM for the LIP; or by the LIP for the IP) before they can access or create a Result for the Logframe of the Intervention – for detailed access information, please view Cooperating with Implementing Partners or Experts.
To access or create a Result first access the Logframe as described in Chapter 4.1.1.1 – How to access a Logframe.
The Logframe is displayed in “MANAGEMENT MODE”, and click on the “Add Result” button to add a new Result.

In the Add Result pop-up window, enter the result name*, result level*, result statement and result assumptions*. Click on the “To be defined” tickbox if the result assumptions are not yet defined.
- (*) Required fields
Please note that result assumptions are not possible if the result level is set to an “overall objective – impact”. |
Click on the “Confirm” button to confirm the creation of the Result.
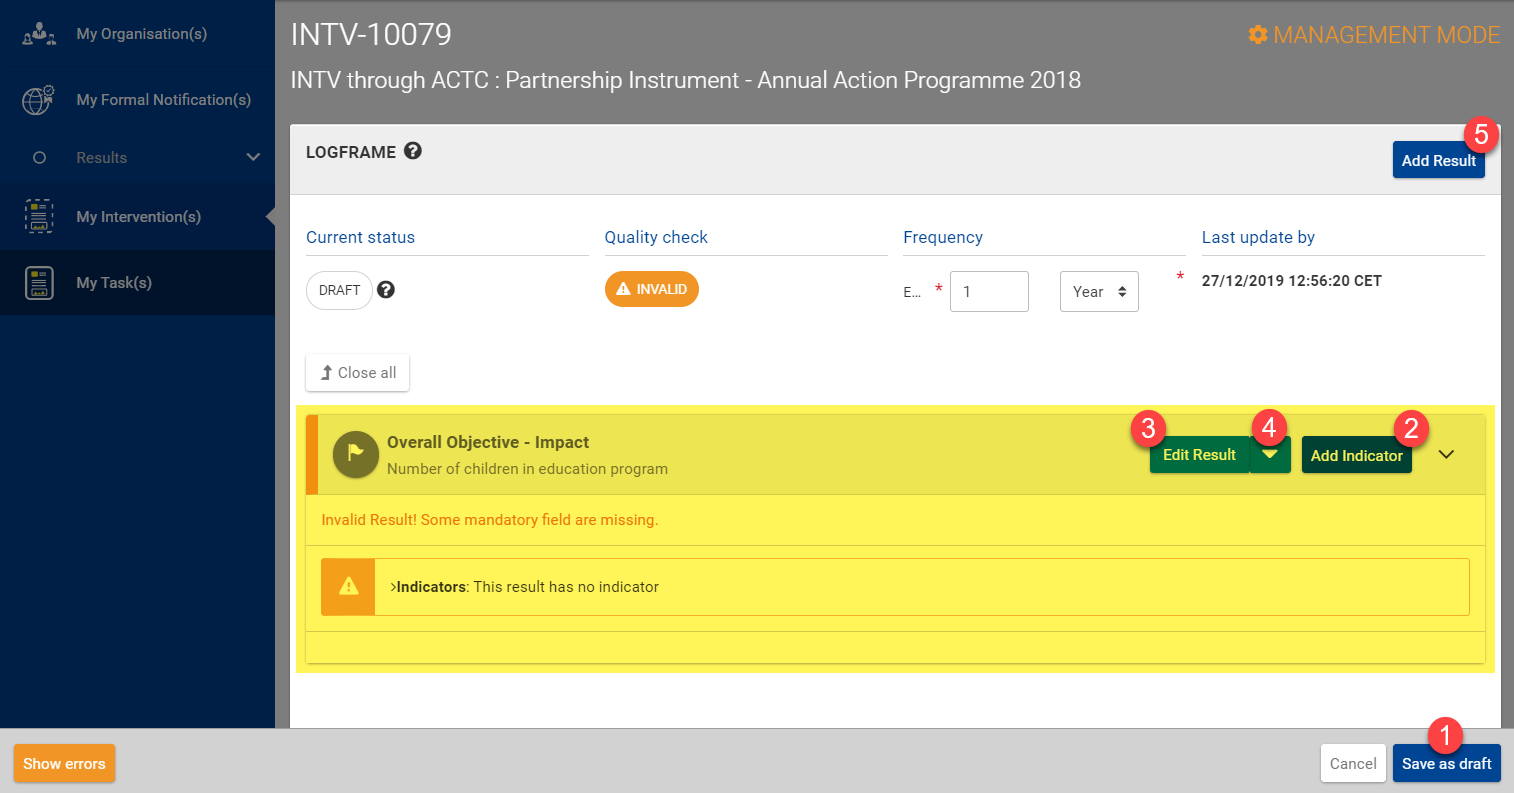
The Result is added to the Logframe, but requires Indicators to be valid (as part of the Quality Check), so either save the Logframe as draft (1), or add indicators (2) and then save.
The Result can also be edited (3) or deleted (4), or new results added (5), before saving.
To edit a Result first access and enter the “MANAGEMENT MODE” of the Logframe – as described in Chapter 4.2.1.1 – Access or Create a Result.
Please note that you can only edit a Result if it has been previously created. |
Click on the “Edit Result” button to edit the Result of the Logframe.

Make sure to select the correct Result (if multiple) for editing. |
In the Edit Result pop-up window, modify the fields as required, and click on the “Confirm” button to confirm the modifications. An edit icon![]() is displayed next to the “Edit Result” button of the Result to indicate that the Result has been modified.
is displayed next to the “Edit Result” button of the Result to indicate that the Result has been modified.
Click on the “Save as draft” button at the bottom right of the page to save the draft Logframe once all the required modifications have been applied.
A Result (including the Indicators) constitutes a part of the initial structure of a Logframe. Subsequently, if any additions and/or modifications are applied to Results, the change in structure of the Logframe needs to be (re)approved by the Operational Manager before any values can be added by Implementing Partners.
To submit a Result, first verify that the information is complete and correct, then save the draft Logframe and submit it for approval.
To delete a Result first access and enter the “MANAGEMENT MODE” of the Logframe – as described in Chapter 4.2.1.1 – Access or Create a Result.
Click on the down arrow button and then select the “Delete Result” option to delete the Result from the Logframe.

Make sure to select the correct Result (if multiple) before deleting, as once deleted, the Result and Indicators (if any) can no longer be recovered. |
In the DELETE RESULT pop-up window, click on the “Continue” button to confirm the deletion of the Result from the Logframe.
Click on the “Save as draft” button at the bottom right of the page to save the draft Logframe once all the required modifications have been applied.
Results have a time-bound element implying a target. An Indicator is a way to measure change and performance against a desired Result, and does not itself have a time-bound element.
A Result can therefore be represented as “snapshot” of Indicator(s) and their value(s) at a specific point in time. Subsequently, the Result should evolve over time as the Indicator progresses; towards a Target, which is the planned (or expected) end-value of the Indicator for a specific time-period.
In other words, an Indicator is a variable specifying how performance can be measured and assessed. They form the basis of the Intervention’s monitoring and evaluation system. They can be either qualitative or quantitative.
Indicators are added and managed when adding a Result to the Logframe of an Intervention:
Watch the video on how to create and add an Indicator. |
In view of harmonising and improving the quality of indicators used in all Logframes, OPSYS facilitates the process by suggesting pre-encoded indicators to Operational Managers and Implementing Partners.
To this purpose and for each DG (namely DG INTPA, DG NEAR and FPI), a group of Quality Managers will be granted specific access to predefine a set of good practice indicators stored in the indicator library.
The Quality Managers identified in each DG (internal staff or external experts) are in charge of creating good practice indicators (i.e. core indicators) in view to suggest them to users (OM of Lead IP when drafting a Logframe). Such indicators will have a number of parameters that the QMs can manage, and that will enable them to formulate sector-specific R-A-C-E-R indicators:
These good practice indicators are referred to as “core or reference indicators”.
The selection of indicators suggested is based on the Result-level (impact, outcome, or output) it is used to measure. Additional criteria used to suggest indicators correspond to DG, Funding Instrument, Basic Act, Sector and/or Benefitting Zone. Each indicator is characterised by an ID number (“indicator code”), a description, a unit of measure (quantitative indicator), a source of verification of progress, guidance, the name of group(s) for aggregation to which it belongs, disaggregation applied (if any), etc.
For the above stated reasons, core indicators (if existing and relevant) should always be used in preference over customised indicators. |
All core indicators created by Quality Managers can be organised in “groups” called an Aggregation Groups. Each aggregation group is made of at least two core indicators for which the values will be aggregated for reporting purposes.
To respond to respective reporting requirements, the Quality Manager who is in charge of creating core indicators, is also responsible (if necessary) for grouping the indicators to meet these requirements.
When creating a Logframe and selecting or creating indicators, the Operational Manager will know whether to select a core indicator used for reporting, and if yes, to which aggregation the indicator belongs.
An example of an aggregation group is the EU Results Framework containing a set of 30 outcome indicators on which DG INTPA is required to report on yearly. These 30 indicators are core indicators grouped under the “EURF” denomination, and each time an Operational Manager decides to select this indicator, the values encoded by the Implementing Partners during the lifetime and at the end of the project will be subject to a specific quality control, and used for reporting at corporate level relating to the framework.
Operational Managers and Implementing Partners can match their Logframe Indicators with Results Framework (RF) Core Indicators (e.g. EURF (EU Results Framework for INTPA and NEAR ENI), IPA II (NEAR IPA II) and FPIRF (FPI Results Framework)) that have been pre-encoded by Quality Managers. For more information on the EU International Cooperation and Development Results Framework (EU RF) and associated core indicators, please click here.
Customised Indicators are matched with Results Framework (RF) Core Indicators when they correspond with the scope outlined in the respective methodological note. Matching of indicators contributes to a better overall reporting on results, and enhanced aggregation of all indicators.
When adding a value to a matched RF Indicator in OPSYS, users will be able to:
To add an Indicator first access and enter the “MANAGEMENT MODE” of the Logframe – as described in Chapter 4.2.1.1 – Access or Create a Result. In the Logframe, you will need to either create a Result before adding an Indicator, or add an Indicator to an existing Result.
For the relevant Result, select the “Add Indicator” button to add an indicator.

In the “Add Indicator – Search for an existing Indicator” pop-up window, a list of suggested core and/or custom (i.e. My Indicators) indicators is displayed. Search for an existing indicator (1), and select the core indicator from the list of search results (2) of suggested indicators.

Please always take preference in selecting a core indicator before selecting or creating customised indicators (i.e. My Indicators). |
From the list of indicators:
For the whole list of indicators, clear the results-level filter by clicking on “More search criteria” and removing the results type.
|
From the “Add Indicator – Fill Indicator’s Attributes” pop-up window:
If you found and selected an indicator, the pre-programmed attributes will be displayed, and you are able to add/modify the values as required:
Once you have completed the required fields and have verified the encoded data, click on the “Confirm” button to confirm the addition of the indicator and its values to the Result.
Remember to save the Logframe as draft after any modification to Result(s) and Indicator(s). |
Indicators are created only if there are no pertinent pre-existing indicators (core or customised) in the suggested list of indicators when adding an Indicator to a Result.
Core Indicators are classified either by context, or by no context, and:
Core indicators are exclusive – this means that if they are disabled or disassociated from a context, they will not be suggested as a core indicator for that context. |
If a core indicator is disabled, but already used in Logframe(s) with values, it is frozen (not editable) with the values in the Logframe (i.e. greyed out).
The creation and management of Core Indicators by the Quality Manager is detailed in the Results and Monitoring User Manual for Internal Users. The usage (i.e. addition, removal) of Core Indicators for Results is detailed below. |
Customised Indicators are classified by Intervention and by the user that created them, and:
Quality Managers have an overall view on all the customised indicators in the system, and can:
To create a customised Indicator first access and enter the “MANAGEMENT MODE” of the Logframe – as described in Chapter 4.2.1.1 – Access or Create a Result. In the Logframe, you will need to either create a Result before creating a customised Indicator, or create a customised Indicator for an existing Result.
For the relevant Result, select the “Add Indicator” button to add an indicator.

Search for an existing customised or core indicator, and only if a relevant existing indicator is not found, click in the “Create new Indicator” button to create a new customised indicator.

In the “Add Indicator – Fill Indicator’s Attributes” pop-up window:
Enter the indicator information (attributes) as required.
- (*) Required fields
Once you have completed the required fields and have verified the encoded data, click on the “Confirm” button to confirm the creation of the customised indicator and its values.
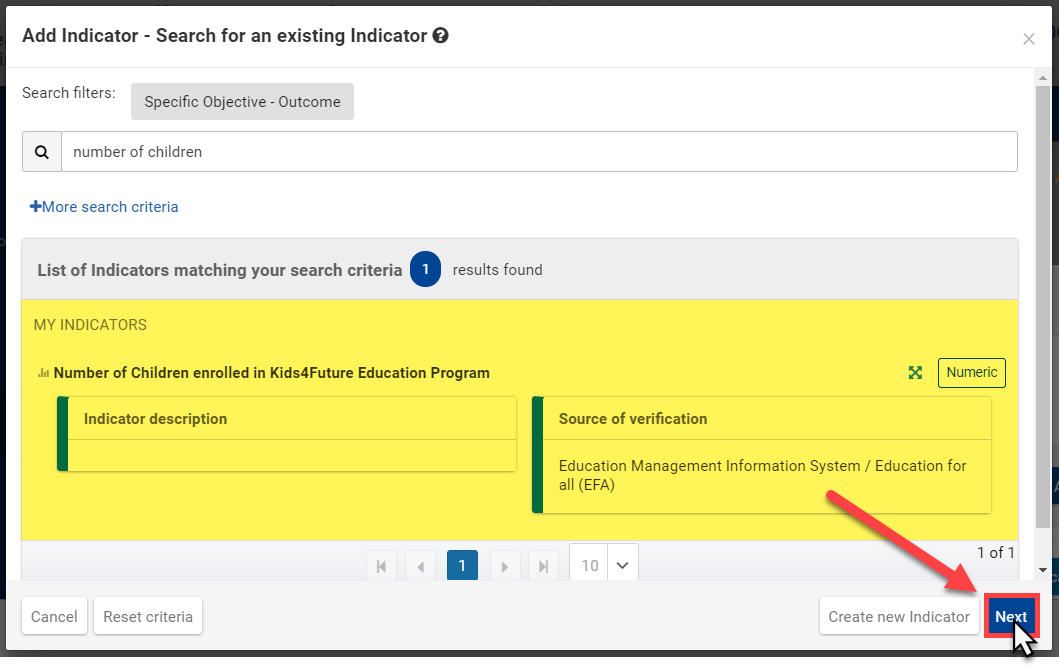
Now, add the customised indicator and values to your Result by selecting the customised indicator that you created from the list of My Indicators, and then click on the “Next” button.
One last verification in the “Add Indicator – Fill Indicator’s Attributes” pop-up window to be sure that you have completed the required fields and have verified the encoded data, then click on the “Confirm” button to confirm the addition of the custom created indicator and its values to the Result.
Remember to save the Logframe as draft after any modification to Result(s) and Indicator(s). |
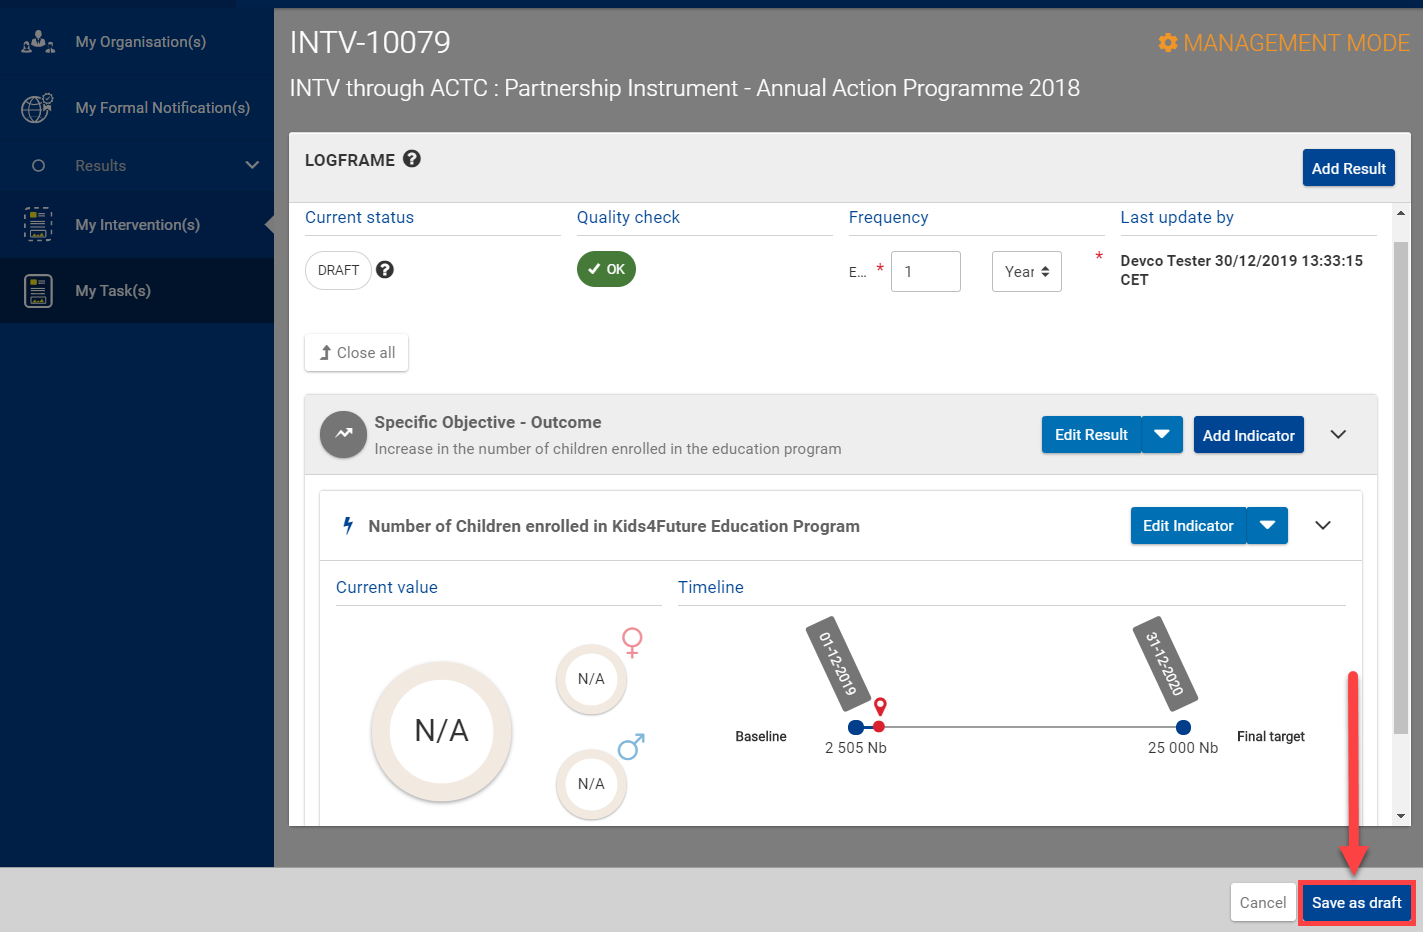
To edit/modify an Indicator first access and enter the “MANAGEMENT MODE” of the Logframe – as described in Chapter 4.2.1.1 – Access or Create a Result. In the Logframe, you will need to have both a Result and an Indicator added to the Result before you are able to edit the Indicator.
For the relevant Result and Indicator, select the “Edit Indicator” button to edit the indicator.

In the “Edit Indicator – Fill Indicator’s Attributes” pop-up window:
Edit the indicator information (attributes) as required.
- (*) Required fields
Please note that if the Logframe is approved, you may only edit the values (baseline, intermediary and final target), and add a comment to an indicator. |
Once you have completed the required fields and have verified the encoded data, click on the “Confirm” button to confirm the modification of the indicator and its values to the Result.
Remember to save the Logframe as draft after any modification to Result(s) and Indicator(s). |
Results and Indicators constitute a part of the initial structure of a Logframe. Subsequently, if any additions and/or modifications are applied to Results and Indicators, the change in structure of the Logframe needs to be (re)approved by the Operational Manager before any values can be added by Implementing Partners.
To submit Indicators, first verify that the information is complete and correct, then save the draft Logframe and submit it for approval.
To delete an Indicator first access and enter the “MANAGEMENT MODE” of the Logframe – as described in Chapter 4.2.1.1 – Access or Create a Result. In the Logframe, you will need to have both a Result and an Indicator added to the Result before you are able to delete the Indicator.
Please note that you cannot delete an Indicator if it contains approved Current Value(s). You first have to delete the Current Value(s) before proceeding to delete the Indicator. |
For the relevant Result and Indicator, click on the drop-down arrow button and then select the “Delete Indicator” option to delete the Indicator from the Result of the Logframe.
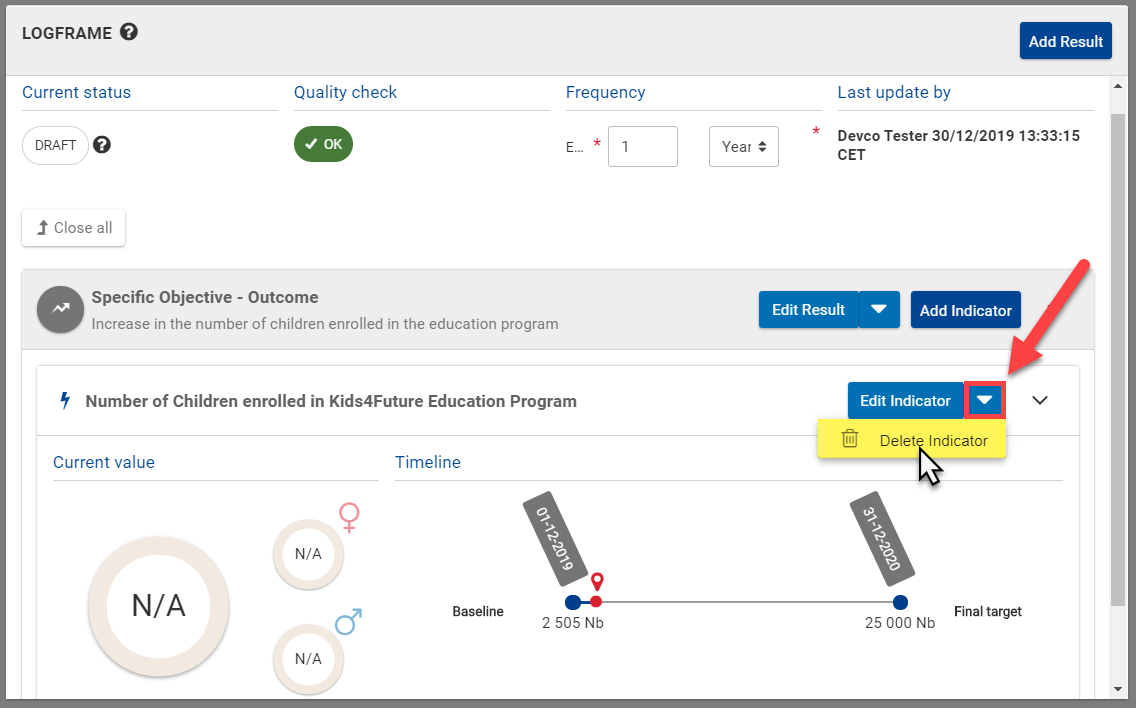
Important note: If you delete an Indicator from a Result, it can no longer be recovered! All the related values and information (e.g. baselines and targets) will also be deleted – you will need to add a new indicator to the Result, along with its values. |
In the “Delete Indicator” pop-up window, click on the “Continue” button to confirm the deletion of the Indicator.
Remember to save the Logframe as draft after any modification to Result(s) and Indicator(s). |
Current values can only be updated for the Indicator of a Result in a Logframe if the Logframe is approved (i.e. the Logframe structure has been approved by the Operational Manager – status “approved”). The Result(s) must also contain baseline and target indicators before it can be updated with current values. Please consult the relevant sections for more information: Chapter 4.1.4 – Submit a draft Logframe, Chapter 4.2.1 – Results, and Chapter 4.2.2 – Indicators.
Watch the video on how to add a Current Value to an Indicator. |
Please note that Current Values can be added to an Indicator of a Logframe, by the Implementing Partners (or optionally the Operational Manager) of the Intervention, only once it has been approved. All EC users may view the Logframe (containing the Results, Indicators and Values) of an Intervention only if it has been approved by the Operational Manager. |
To add a Current Value first access the Logframe as described in Chapter 4.1.1.1 – How to access a Logframe.
Remember that you cannot add values to indicators if the Logframe is pending approval by the Operational Manager. |
For the relative Indicator of the Result in the Logframe, click on the down arrow button and select the “Add Value” option.
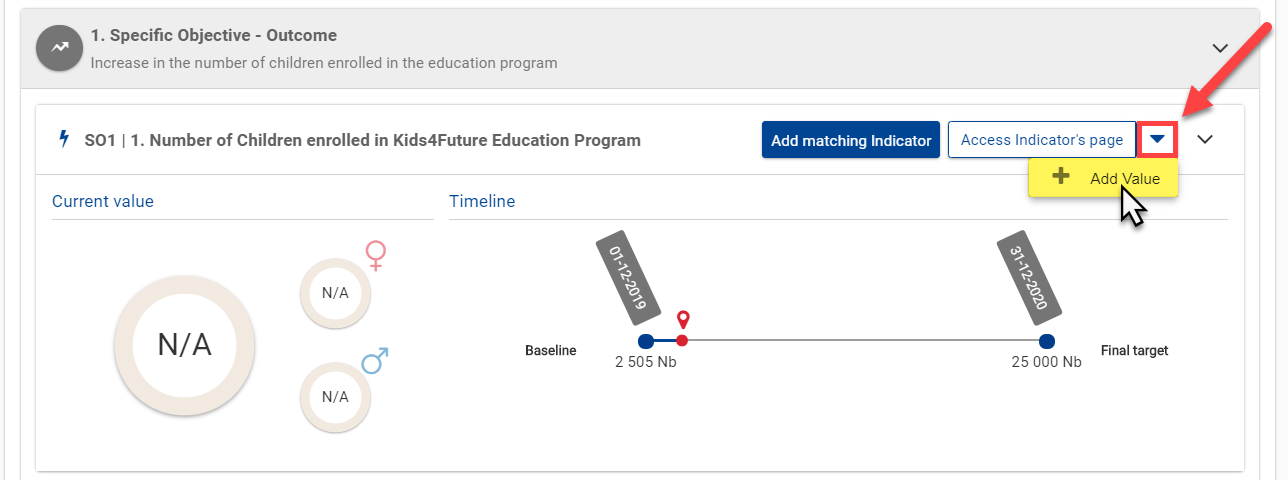
Alternatively, you may also add a current value from the Indicator page by clicking on the “Access Indicator’s page” button, and then clicking on the “Add Value” button.
In the “Add Indicator value” pop-up window:
Add the current value information (attributes) as required:
- (*) Required fields
Please note that if an indicator value (baseline, intermediary, target or current) is set as “N/A”, a warning message is displayed for the Logframe, reminding the user that there are values that still need to be defined by the user. |
Once you have completed the required fields and have verified the encoded data, click on the “Save” button to confirm the addition of the current value to the indicator of the Result.
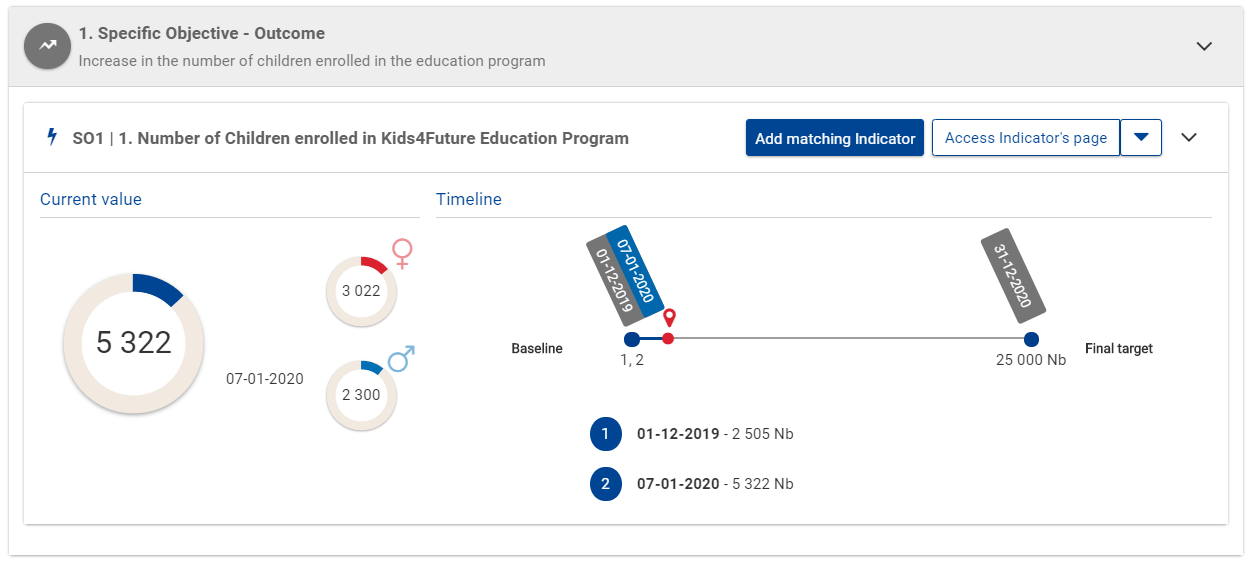
Remember to submit Indicator Values for approval to the Operational Manager after you have completed any addition and/or modifications to Indicator values. |
To edit a Current Value first access the Logframe as described in Chapter 4.1.1.1 – How to access a Logframe, and then click on the “Access Indicator’s page” button of the relative Indicator in the Result of the Logframe.

Please note that you can access the Indicator’s page (button displayed) only if the Logframe, Result and Indicator are created and approved (i.e. not in “DRAFT” status). You cannot therefore edit values to indicators if the Logframe is pending approval by the Operational Manager. |
On the Indicator’s page, scroll down to the table of Indicator’s values, click on the edit icon button of the current value to modify it.
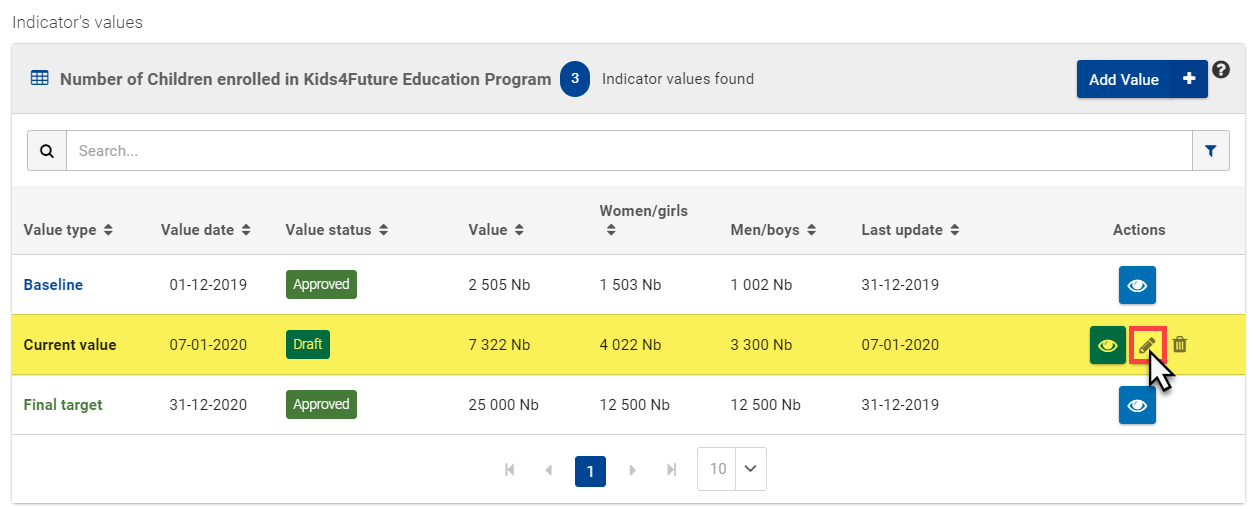
Make sure to select the correct value (if multiple) before editing. |
In the “Edit Indicator value” pop-up window:
Edit the current value information (attributes) as required:
- (*) Required fields
Please note that if an indicator value (baseline, intermediary, target or current) is set as “N/A”, a warning message is displayed for the Logframe, reminding the user that there are values that still need to be defined by the user. |
Once you have completed the required fields and have verified the encoded data, click on the “Save” button to confirm the modification of the current value to the indicator of the Result.
Remember to click on the “Save” button at the bottom of the Indicator’s page, and submit Indicator Values for approval to the Operational Manager after you have completed any addition and/or modifications to Indicator values. |
To submit a Current Value first access the Logframe as described in Chapter 4.1.1.1 – How to access a Logframe.
Only Lead Implementing Partners can submit Indicator Values for review and approval by the Operational Manager. |
On the Logframe page, verify that the information on the values is complete and correct (access the Indicator’s page if further verification is required), and then click on the “Submit Indicator Values” button at the top right of the Logframe page to submit the indicator values.

You can only submit indicator values for approval if they have been created first, are in “draft” status, and are accessible from the Indicator’s page. |
In the confirmation pop-up window, click on the “Continue” button to confirm the submission of values to the Operational Manager for review and approval.
Please note that values can always be edited by the Implementing Partners once they have been created and sent for approval, even if the value is still pending approval by the Operational Manager. This is no longer possible once the value is approved. |
To delete a Current Value first access the Logframe as described in Chapter 4.1.1.1 – How to access a Logframe, and then click on the “Access Indicator’s page” button of the relative Indicator in the Result of the Logframe.

Please note that you can access the Indicator’s page (button displayed) only if the Logframe, Result and Indicator are created and approved (i.e. not in “draft” or “pending for approval” status). You cannot therefore delete values to indicators if the Logframe is pending approval by the Operational Manager. |
On the Indicator’s page, scroll down to the table of Indicator’s values, and click on the delete icon![]() button of the current value to delete it.
button of the current value to delete it.
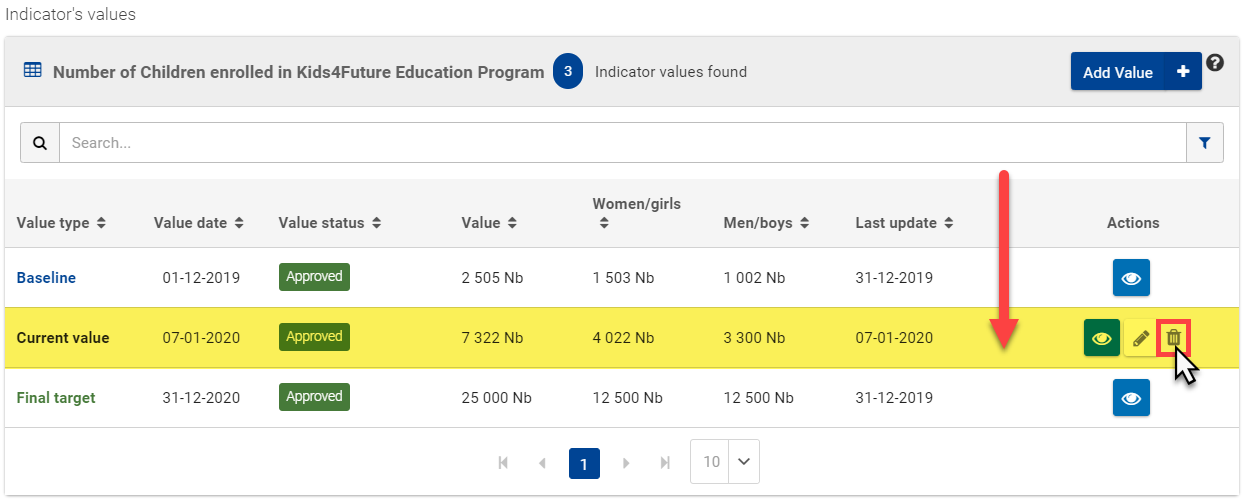
In the Delete a value pop-up window, click on the “Continue” button to confirm the deletion of the Current Value, and the value is permanently removed from the Indicator.
Please note that values can always be deleted by the Implementing Partners once they have been created and sent for approval, even if the value is still pending approval by the Operational Manager. This is no longer possible once the value is approved. |
Logframes and Current Values (for all once created) follow a review mechanism for validation purposes, ensuring a consistent exchange, follow-up and data-quality assurance between the Operational Managers and Implementing Partners for Projects and Programmes.
The review mechanism is controlled by a status workflow, which includes review functions and status transitions to facilitate the review mechanism.
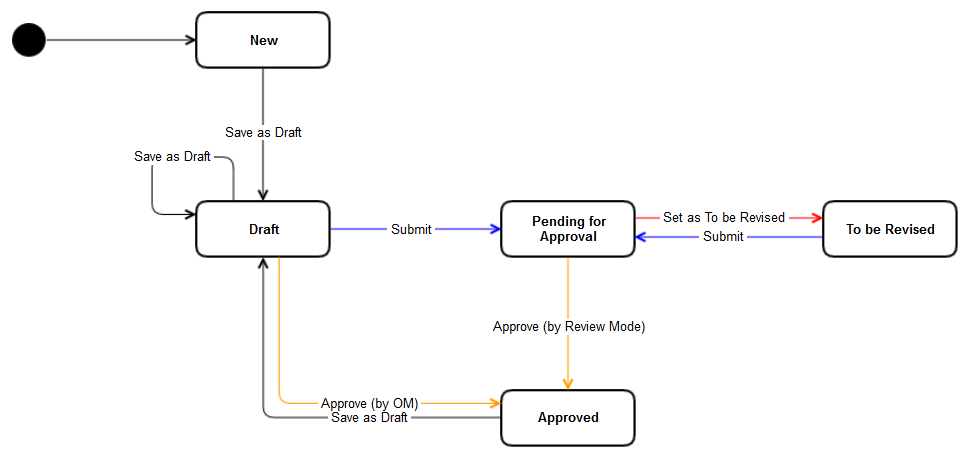
Results and Indicators constitute as part of the initial structure of a Logframe. Subsequently, if any additions and/or modifications are applied to Results and Indicators, the change in structure of the Logframe needs to be (re)approved by the Operational Manager before any values can be added by Implementing Partners. Therefore, to submit Results or Indicators, first verify that the information in the Logframe, Result(s) and Indicator(s) are complete and correct, then save the draft Logframe and submit it for approval.
Current Values are progress measurements added to Indicators, so modifications can be applied without adapting the initial structure of the Logframe. Current Values can therefore undergo a review mechanism without requiring the (re)approval of the Logframe.
|
Once the structure of the Logframe is set (i.e. the required Results and Indicators encoded), the Lead Implementing Partner submits the Logframe to the Operational Manager for approval.
While pending for approval, Implementing Partners cannot manage the Logframe, which includes the add/edit/delete of Results or Indicators. |
Operational Managers can approve either a part or all of the structure of the Logframe, add comments, or set as to be revised if changes need to be applied before approval.
1. If the Logframe is "To be Revised"
The Implementing Partner receives an e-mail notification, and a notification and task is generated the Funding & Tenders Portal, inviting them to revise the Logframe.
Access the Logframe, and click on the “Review Logframe” button at the top right of the page (only displayed if the Logframe is in the “To be revised” status). The Logframe is displayed in “REVIEW MODE”.
Revise the Logframe by:
i) Identifying the sections (Results and/or Indicators) that need to be revised, which are indicated by the thumbs-down (1) icon![]() ,
,  indicator (2), and relevant required comments (3);
ii) Reading the relevant comments either in the concerned section (3), or in the comments box (4) on the left (displayed in chronological order, with the most recent at the top);
iii) Taking the necessary actions by using the appropriate action buttons (5) to add/edit/delete Results and/or Indicators (as required), or to read/add comments![]() .
.
iv) Remember to “Save as draft” (6) or “Submit Logframe” (7) (only Lead Implementing Partner) for review to the Operational Manager once all the required modification have been applied.

From submitted after revision, the Logframe is resent to the Operational Manager for approval.
2. If the Logframe is “Approved”
When the Logframe is approved (i.e. status “Approved”) by the Operational Manager, it becomes visible to all EC users, and the Implementing Partners are now able to manage the Logframe (Results and Indicators) and add Current Values.
After a Logframe has been reviewed and approved by the Operational Manager, Current Values can be added to the Indicators by the Implementing Partners. These Current Values (once submitted) equally undergo a review mechanism, similar to Logframes detailed above, for the validation and approval process.
Implementing Partners can still manage (edit or delete) an indicator value that is still pending for approval, but once the value has been approved, the value can no longer be modified. |
Operational Managers can approve either one, multiple, or all of the indicator values, add comments, or set as to be revised, depending on the structure of the indicator and values, and if changes need to be applied before approval.
1. If the Indicator Values are “To be Revised”
The Lead Implementing Partner receives an e-mail notification, and a notification and task is generated in the Funding & Tenders Portal, inviting them to revise the Logframe values.
Access the Logframe, and click on the “Review Indicator Values” button at the top right of the page (only displayed if indicator value(s) status is “To be revised”). The list of Indicators and associated values are displayed in “REVIEW MODE”.
Revise the Indicator Values by:
i) Identifying the indicators and values that need to be revised, which are indicated by the “To be revised” value status (1), or by activating the “Show to be revised” toggle (2);
ii) Reading the relevant comments either for the concerned value (3), or in the comments box (4) on the left (displayed in chronological order, with the most recent at the top);
iii) Taking the necessary actions by using the appropriate action buttons (5) to edit/delete the Current Value (as required), or to read/add comments![]() .
.
iv) Remember to “Save as draft” (6) or “Submit” (7) (only Lead Implementing Partner) for (re-)review to the Operational Manager once all the required modification have been applied.
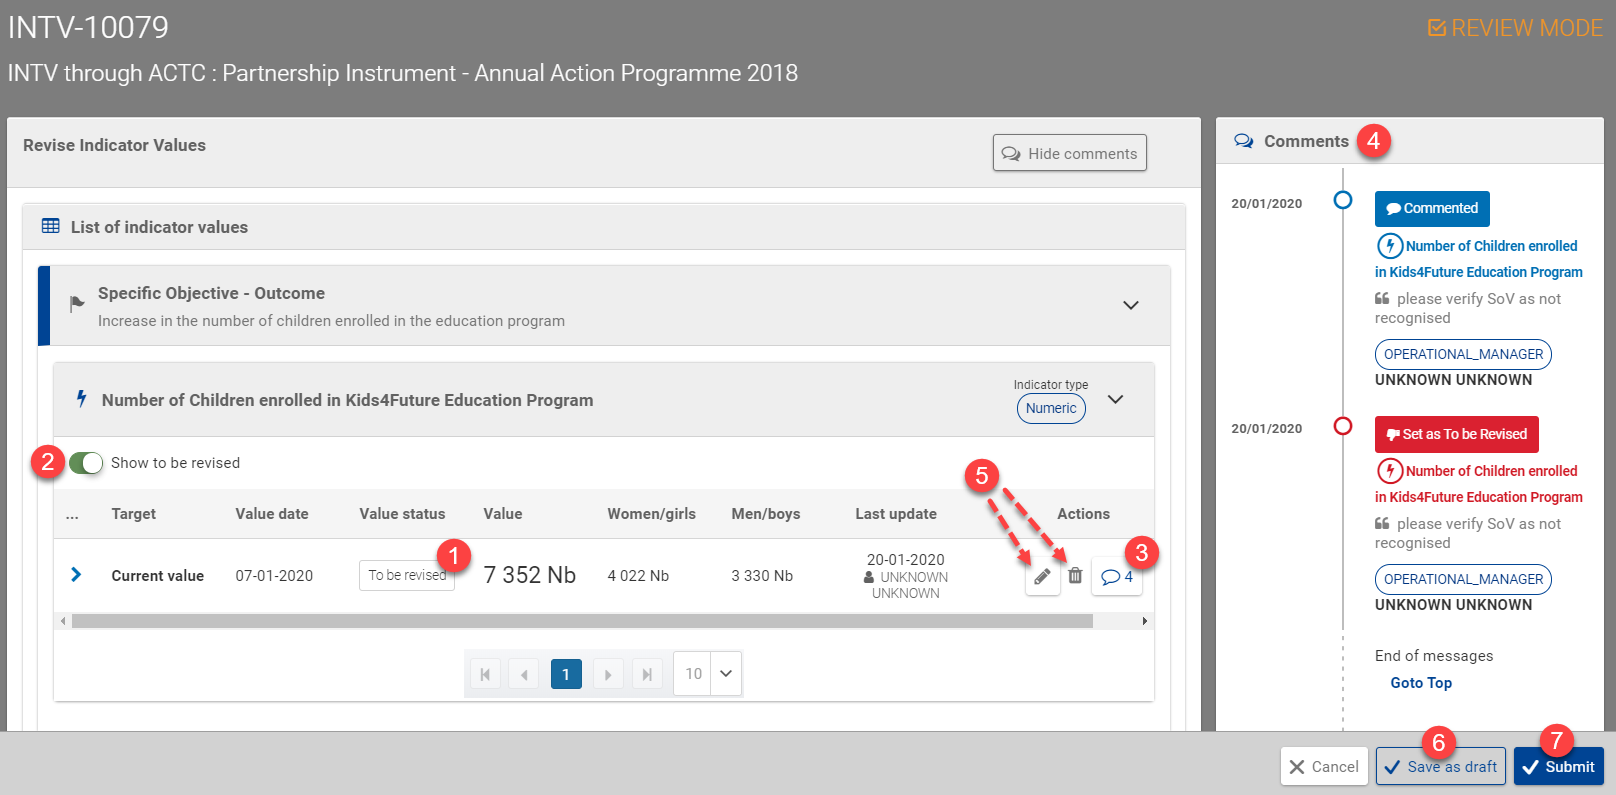
Once submitted after revision, the Indicator Values are resent to the Operational Manager for approval.
2. If the Indicator Values are “Approved”
When the Indicator Values are approved (i.e. status “Approved”) by the Operational Manager, they become visible to all EC users.